⌛️ Approximate time to complete: 20 min.
In this tutorial you will learn how to bring your own decision model to the Nextmv Platform, from scratch. Complete this tutorial if you:
- Have a pre-existing decision model and you want to explore the Nextmv Platform.
- Are fluent using a language of your preference, such as C++, Java, Python, etc.
To complete this tutorial, we will use two external examples, working under the principle that they are not Nextmv-created decision models. You can, and should, use your own decision model, or follow along with the examples provided:
- Simple LP problem authored by HiGHS in C++.
- Vehicle Routing Problem with Pickups and Deliveries authored by OR-Tools in Java.
At a high level, this tutorial will go through the following steps using both examples:
- Nextmv-ify the decision model.
- Push the model to Nextmv Cloud.
- Run the model remotely.
- Perform scenario testing.
Let’s dive right in 🤿.
1. Prepare the executable code
If you are working with your own decision model and already know that it executes, feel free to skip this step.
The decision model is composed of executable code that solves an optimization problem. Copy the desired example code to a script named main.cpp for the HiGHS example and src/main/java/com/google/ortools/constraintsolver/samples/VrpPickupDelivery.java for the OR-Tools example.
2. Set up requirements
If you are working with your own decision model and already have all requirements ready for it, feel free to skip this step.
The two examples require different setups. These are the requirements that you need before compiling and running the examples.
2.1. HiGHS
Stand at the root of the project where you placed the main.cpp file.
Make sure you can run
g++(C++ compiler).Make sure you can run
cmake(CMake build system).Clone HiGHS from GitHub to build the solver.
- Build HiGHS, the solver itself.
- After building, a
./HiGHS/build/libdirectory should exist with the necessary libraries.
2.2. OR-Tools
Stand at the root of the project where you placed the src directory.
Make sure you can run
java(JDK 11 or higher).Make sure you can run
mvn(Maven).Create a
pom.xmlfile to manage dependencies.
3. Compile and run the executable code
If you are working with your own decision model and already know that it executes, feel free to skip this step.
These are the steps for compiling and running the two examples.
3.1. HiGHS
Stand at the root of the project where you placed the main.cpp file.
Execute the following command to compile the code.
A
./mainbinary should have been created.Execute the following command to run the code.
Here is the output produced by the example.
3.2. OR-Tools
Stand at the root of the project where you placed the src directory.
Execute the following command to compile the code.
A
./main.jarfile should have been created.Execute the following command to run the code.
Here is the output produced by the example.
4. Nextmv-ify the decision model
We are going to turn the executable decision model into a Nextmv application.
So, what is a Nextmv application? A Nextmv application is an entity that contains a decision model as executable code. An application can make a run by taking an input, executing the decision model, and producing an output. An application is defined by its code, and a configuration file named app.yaml, known as the "app manifest".
Think of the app as a shell, or workspace, that contains your decision model code, and provides the necessary structure to run it.
A run on a Nextmv application follows this convention:
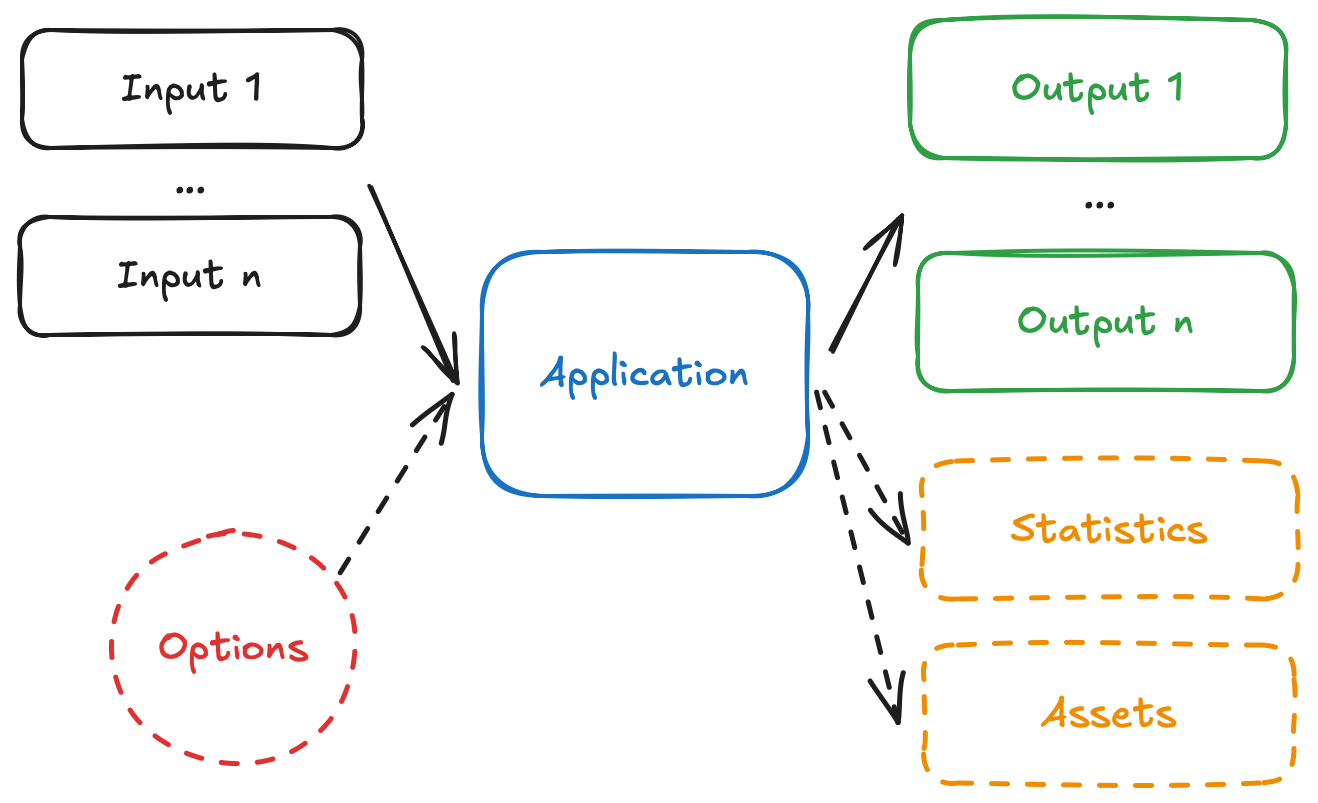
- The app receives one, or more, inputs (problem data), through
stdinor files. - The app run can be configured through options, that are received as CLI arguments.
- The app processes the inputs, and executes the decision model.
- The app produces one, or more, outputs (solutions), and prints to
stdoutor files. - The app optionally produces statistics (metrics) and assets (can be visual, like charts).
We are going to adapt the examples so that they can follow these conventions.
Start by adding the app.yaml file, which is known as the app manifest, to the root of the project. This file contains the configuration of the app.
This tutorial is not meant to discuss the app manifest in-depth, for that you can go to the manifest docs. However, these are the main attributes shown in the manifests:
type: both are different types of applications.runtime: HiGHS uses thedefaultruntime to execute binaries, while OR-Tools uses thejavaruntime to execute Java applications.build.command: specifies in both cases the command to build the executable code. We are going to compile an artifact for both examples.execution.entrypoint: specifies in both cases the executable code to run.files: contains files that make up the executable code of the app. For HiGHS, we are including themainbinary and the required libraries. For OR-Tools, we are including themain.jarfile.configuration.content: HiGHS will use thejsonformat, so it does not need additional configurations. OR-Tools will usemulti-file, so additional configurations are needed. As you complete this tutorial, the difference between the two formats will become clearer.configuration.options: for both examples, we are adding options to the application, which allow you to configure runs, with parameters such as solver duration.
Now, you can overwrite your decision model files with the Nextmv-ified version.
This is a short summary of the changes introduced for each of the examples:
- HiGHS
- Added parsing of command line arguments to extract options.
- Added reading of input data from
stdin, injsonformat. - Modified the model definition to use the loaded input data.
- Store the solution to the problem, and solver metrics (statistics), in an output.
- Write the output to
stdout, given that we are working with thejsoncontent format.
- OR-Tools
- Added parsing of command line arguments to extract options.
- The input data is no longer in the Java file itself. We are representing the problem with several files under the
inputsdirectory. Ininputs/distance.jsonwe are going to write the distance matrix. Ininputs/pickups_deliveries.jsonwe are going to set the information about the precedence of stops, defining pickup-delivery pairs. Ininputs/problem.jsonwe are storing additional information about the problem. When working with more than one file, themulti-filecontent format is ideal. - Modified the model definition to use the loaded input data.
- Write the output to several files, under the
outputsdirectory, given that we are working with themulti-filecontent format.
Here are the data files that you need to place in an inputs directory.
HiGHS
OR-Tools
Aside from the app.yaml manifest file, the code changes, and the introduction of the inputs directory, we need to make some more minor adjustments.
4.1. HiGHS
Given we introduced the
nlohmann/jsonlibrary for JSON parsing and writing, we need to get the library.When we push the Nextmv application to Cloud, we need to cross-compile for Linux ARM64. To do this, we can use Docker. Add the following
Dockerfileto the root of your Nextmv application.In the
app.yamlmanifest, we specified abuild.shscript that will run before pushing the app. This script will cross-compile the necessary dependencies and the binary so that it is ready to run in the Nextmv Platform.
After you are done Nextmv-ifying, your Nextmv app should have the following structure for this example.
Now you are ready to explore the Nextmv Platform 🥳.
4.2. OR-Tools
Modify the
pom.xmlfile to include the new dependencies.
After you are done Nextmv-ifying, your Nextmv app should have the following structure for this example.
Now you are ready to explore the Nextmv Platform 🥳.
5. Re-compile and run the executable code
Given that we made some modifications to the examples to Nextmv-ify them, we need to re-compile and run again to make sure they work.
5.1. HiGHS
Compile the example, using the following command. Note that this command is different from the one already shown before.
A
./mainexecutable file should have been created.Run the example, reading the problem definition from
stdin, and writing the output tostdout.
Here is the updated output produced by this example.
5.2. OR-Tools
The commands for compiling and running stay the same.
Execute the following command to compile the code.
A
./main.jarfile should have been created.Execute the following command to run the code.
Here is the updated output produced by this example.
6. Create an account
The full suite of benefits starts with a Nextmv Cloud account.
- Visit the Nextmv Console to sign up for an account at https://cloud.nextmv.io.
- Verify your account.
- You’ll receive an email asking to verify your account.
- Follow the link in that email to sign in.
- Log in to your account. The Nextmv Console is ready to use!
Once you have logged in to your account, you need to fetch your API key. You can do so from your settings.

When you have your API key, it is convenient to save it as an environment variable so that you can use it for the rest of this tutorial.
7. Subscribe to a Nextmv Plan
If you already have an active Nextmv Plan, you can skip this step.
If a Nextmv member provides different instructions for activating a Nextmv Plan, please follow those instructions instead.
Running a custom application remotely in Nextmv Cloud requires a paid plan. However, plans come with a 14-day free trial that can be canceled at any time. You can upgrade your account and subscribe to a plan in Nextmv Console by clicking the Upgrade button in the header, or navigating to the Settings → Plan section. Upgrading to a plan will allow you to complete the rest of the tutorial.
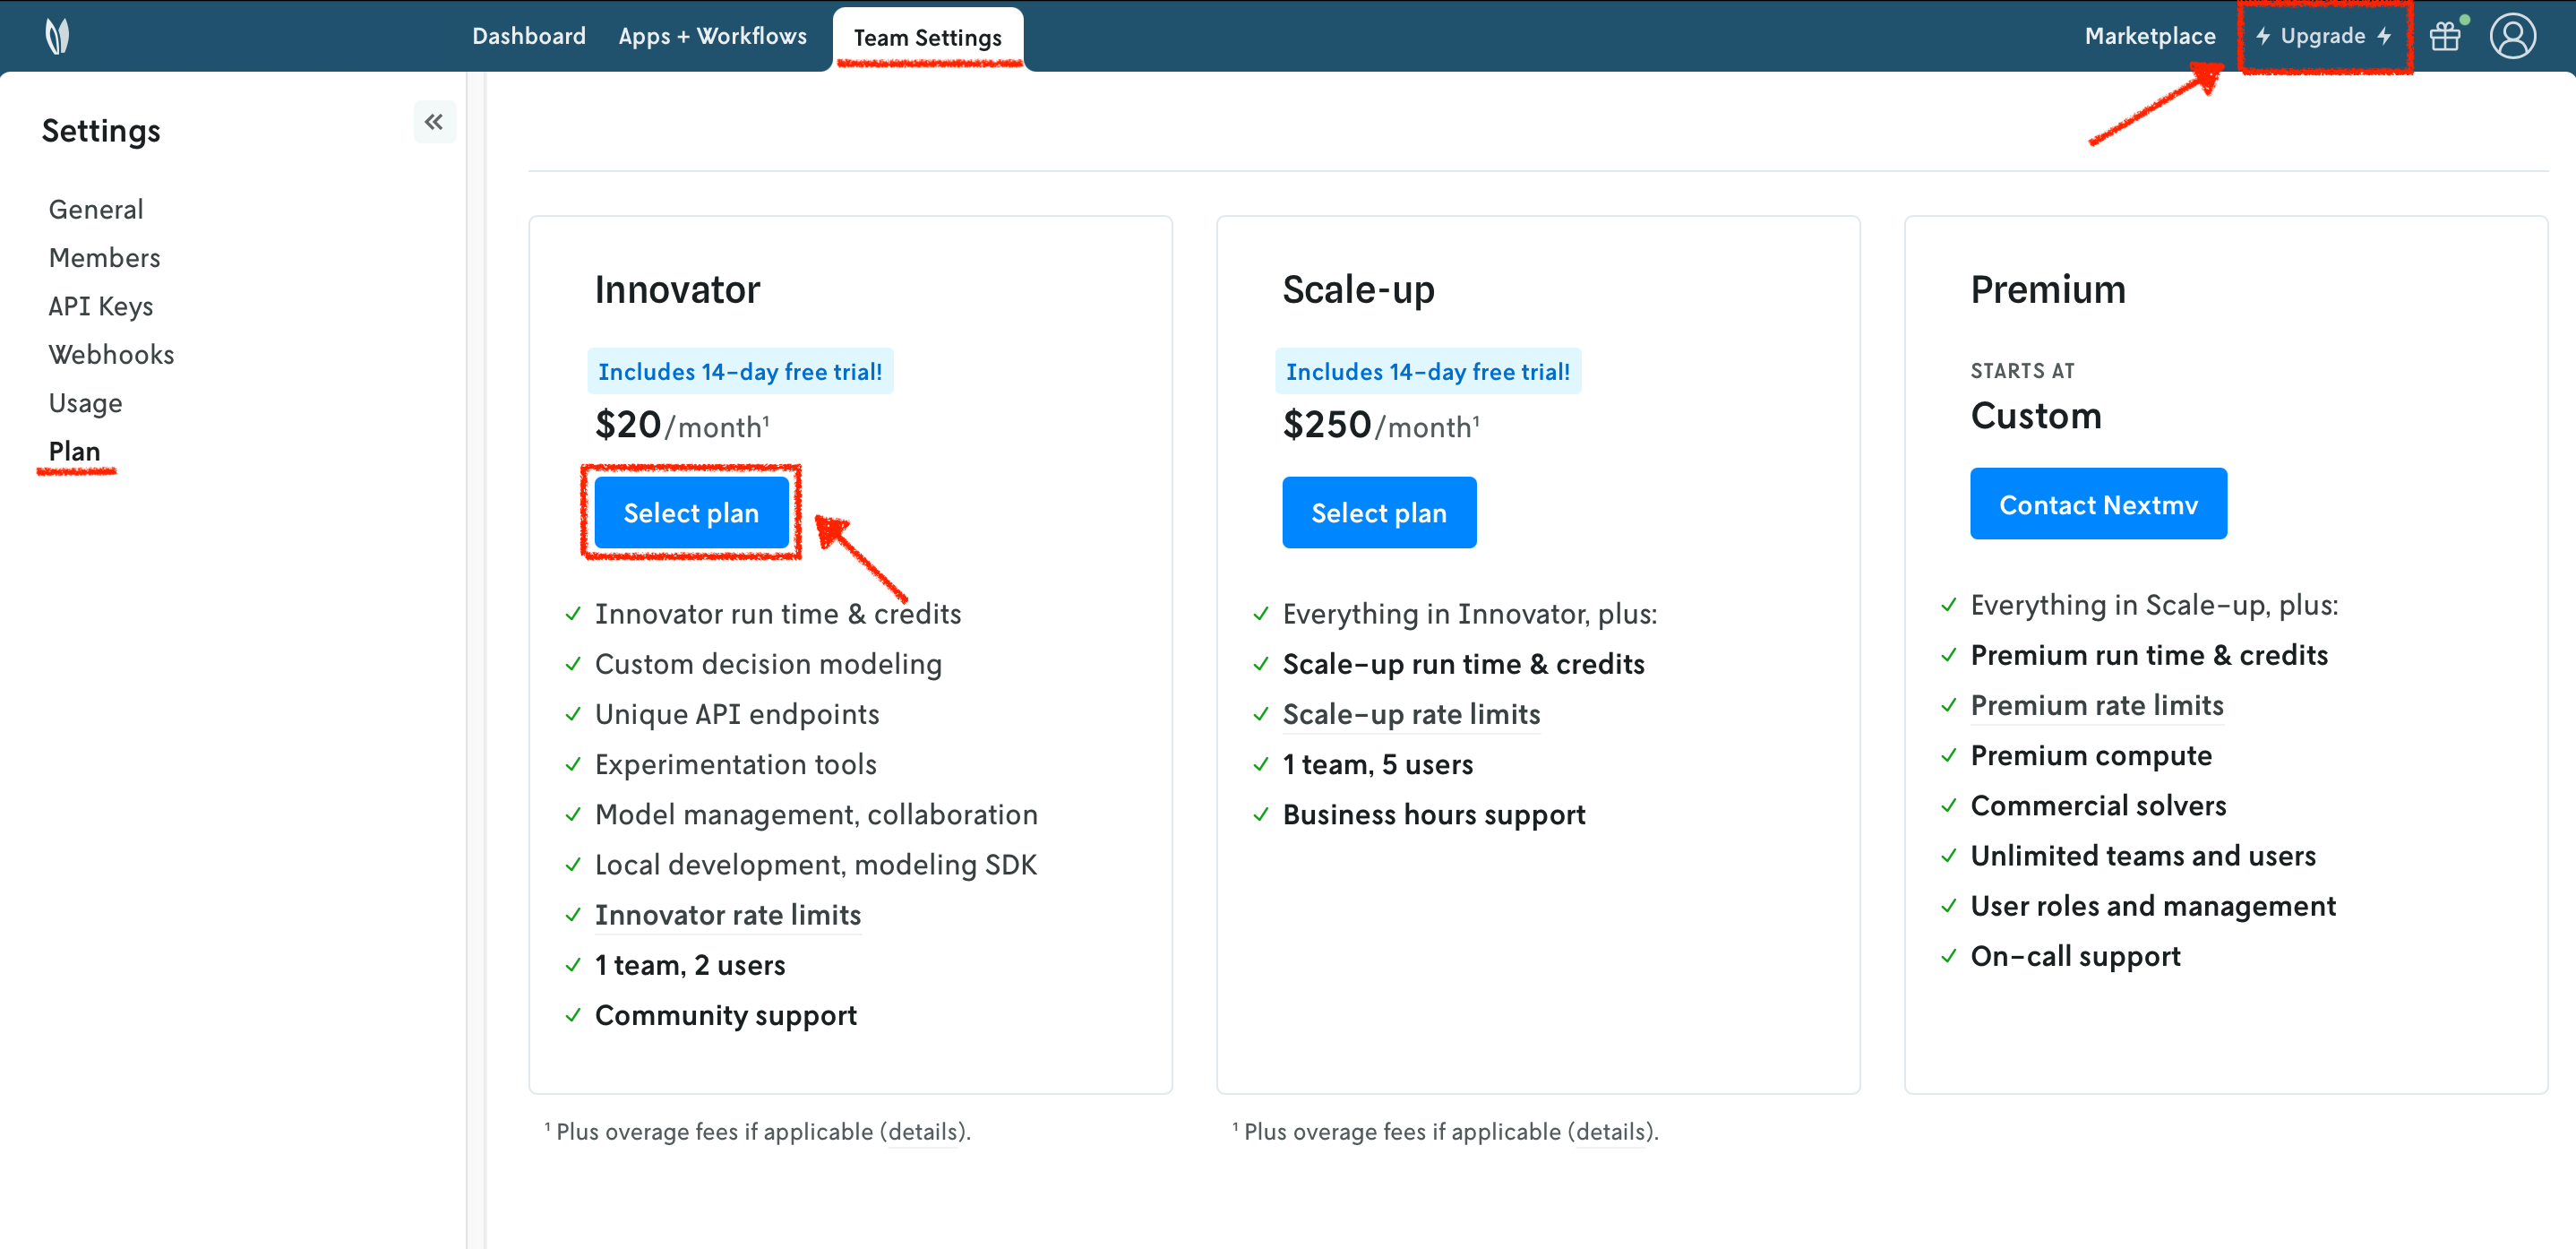
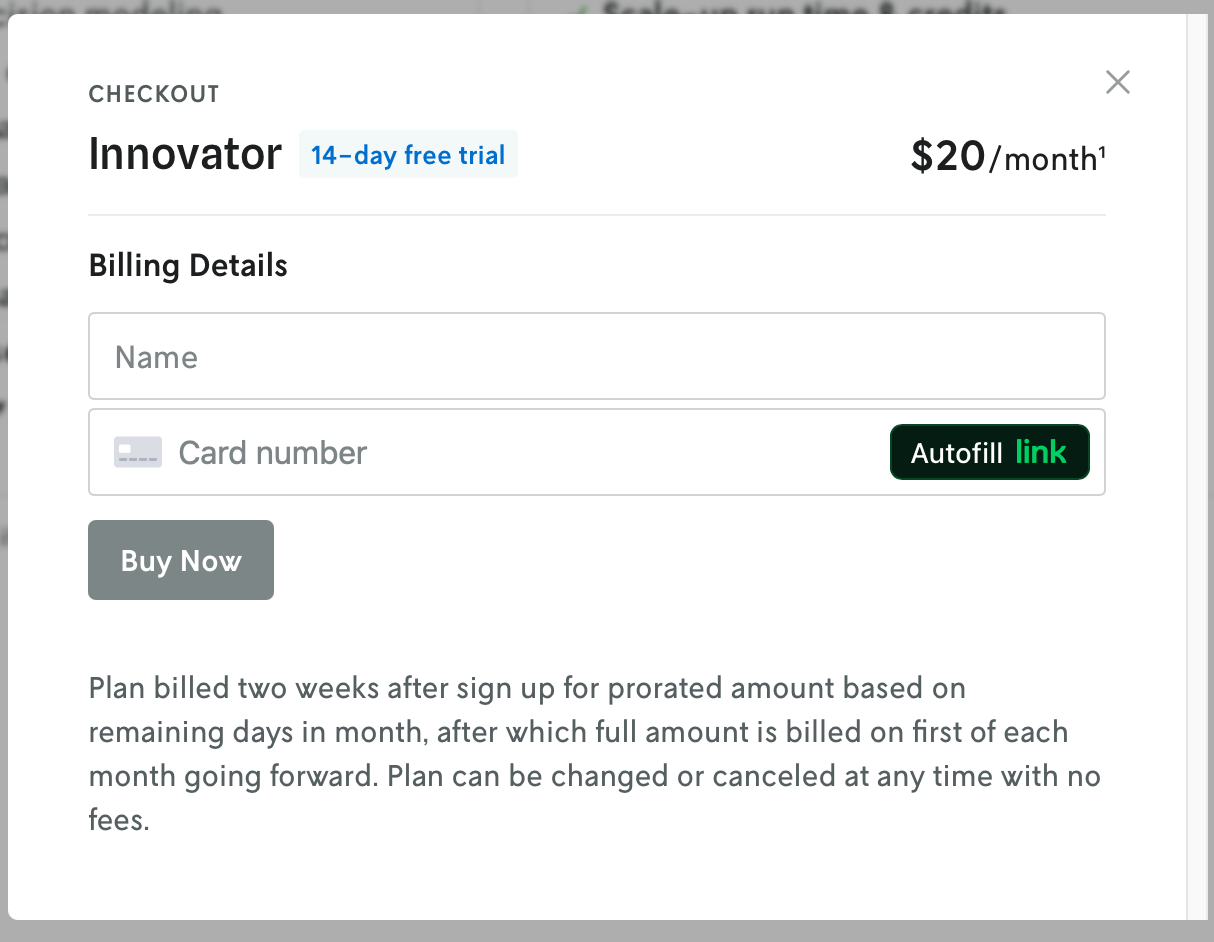
In the example shown below, you will be subscribing to an Innovator plan. A pop-up window will appear, and you will need to fill in your payment details.
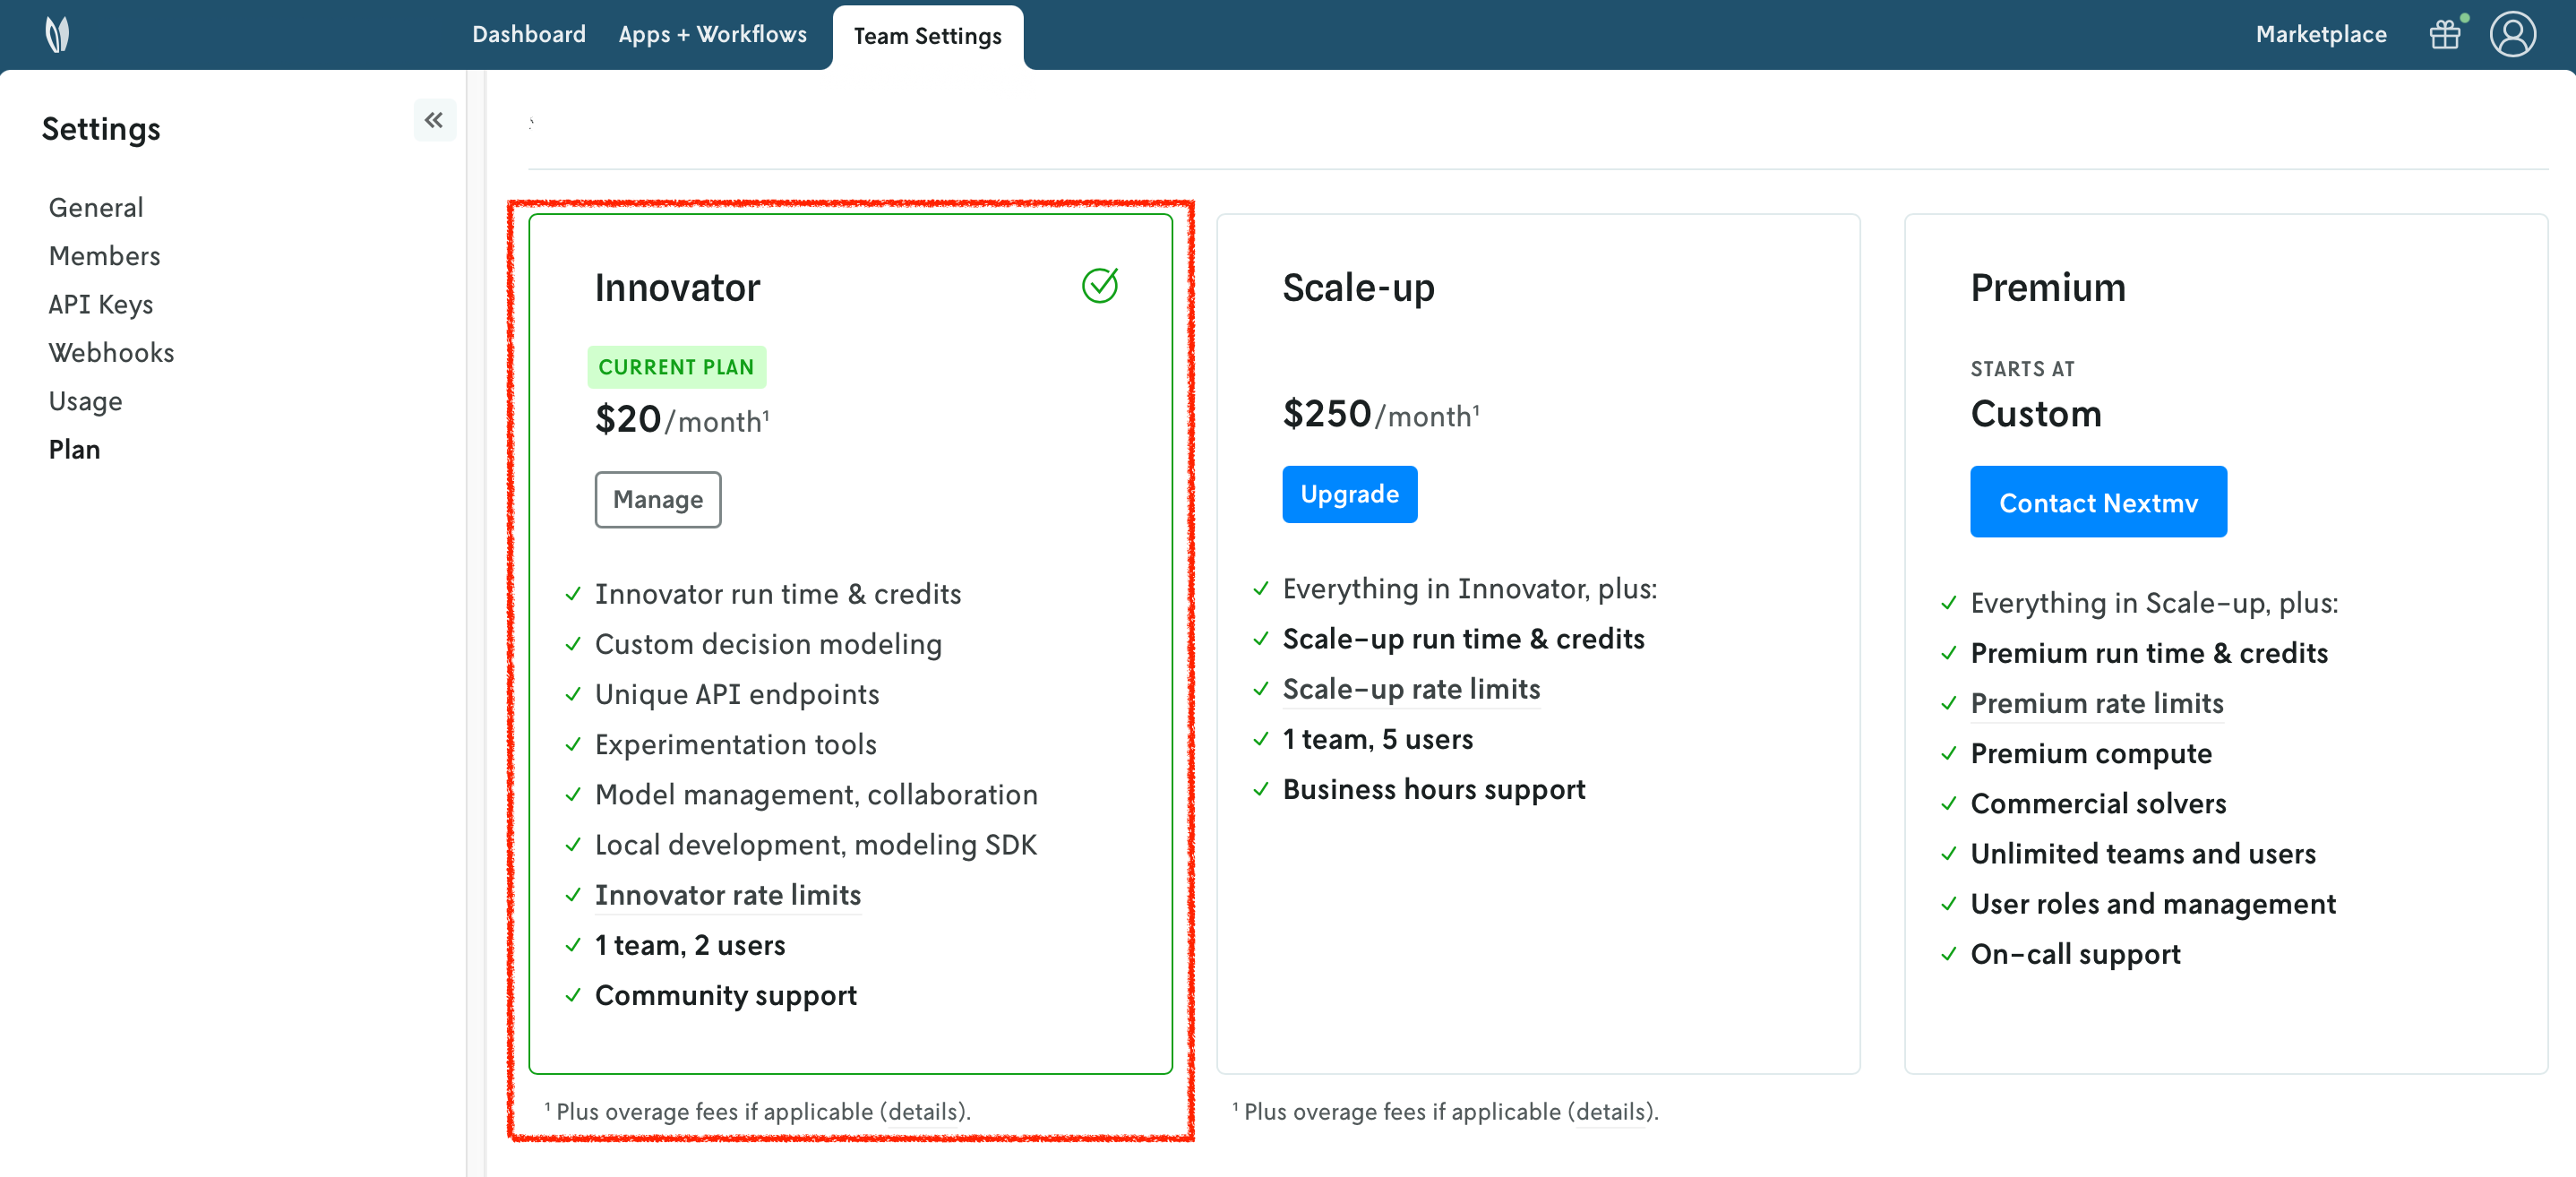
Once your account has been upgraded, you will see an active plan in your account.
8. Install the Nextmv CLI
Install the Nextmv CLI. Python >=3.10 is required. Install using the Python package manager of your choice. The CLI is available for macOS, Linux, and Windows.
After installing, configure Nextmv CLI with your account:
To check if the installation was successful, run the following command to show the help menu:
9. Create your Nextmv Cloud application
At the root of your local project (where the app.yaml manifest is located), run the following command:
This will create a new application in Nextmv Cloud. Note that the name and app ID can be different, but for simplicity this tutorial uses the same name and app ID. This command is saved as app1.sh in the full tutorial code. You can also create applications directly from Nextmv Console.
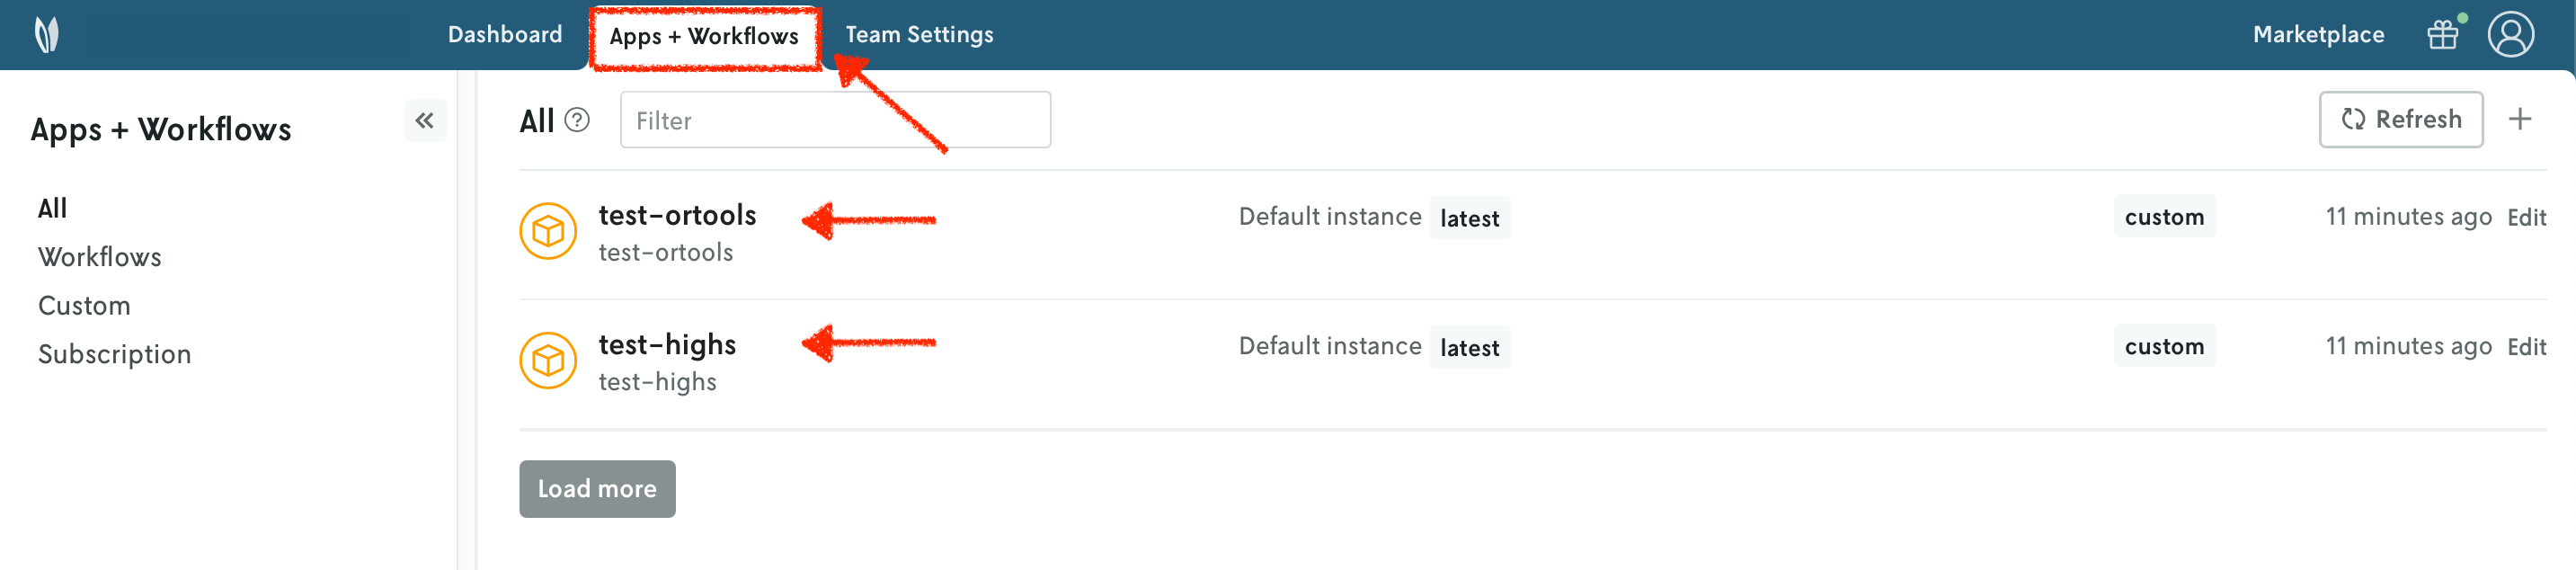
You can go to the Apps section in the Nextmv Console where you will see your applications.
10. Push your Nextmv application
So far, your application has run locally. You are going to push your app to Nextmv Cloud. Once an application has been pushed, you can run it remotely, perform testing, experimentation, and much more. Pushing is the equivalent of deploying an application, this is, taking the executable code and sending it to Nextmv Cloud.
Deploy your app (push it) to Nextmv Cloud:
This command is saved as app2.sh in the full tutorial code.
You can go to the Apps section in the Nextmv Console where you will see your application. You can click on it to see more details. Once you are in the overview of the application in the Nextmv Console, it should show the following:
- There is now a pushed executable.
- There is an auto-created
latestinstance, assigned to the executable.
An instance is like the endpoint of the application.
11. Run the Nextmv application remotely
To run the Nextmv application remotely, you have several options. For this tutorial, we will be using the Nextmv Console and CLI.
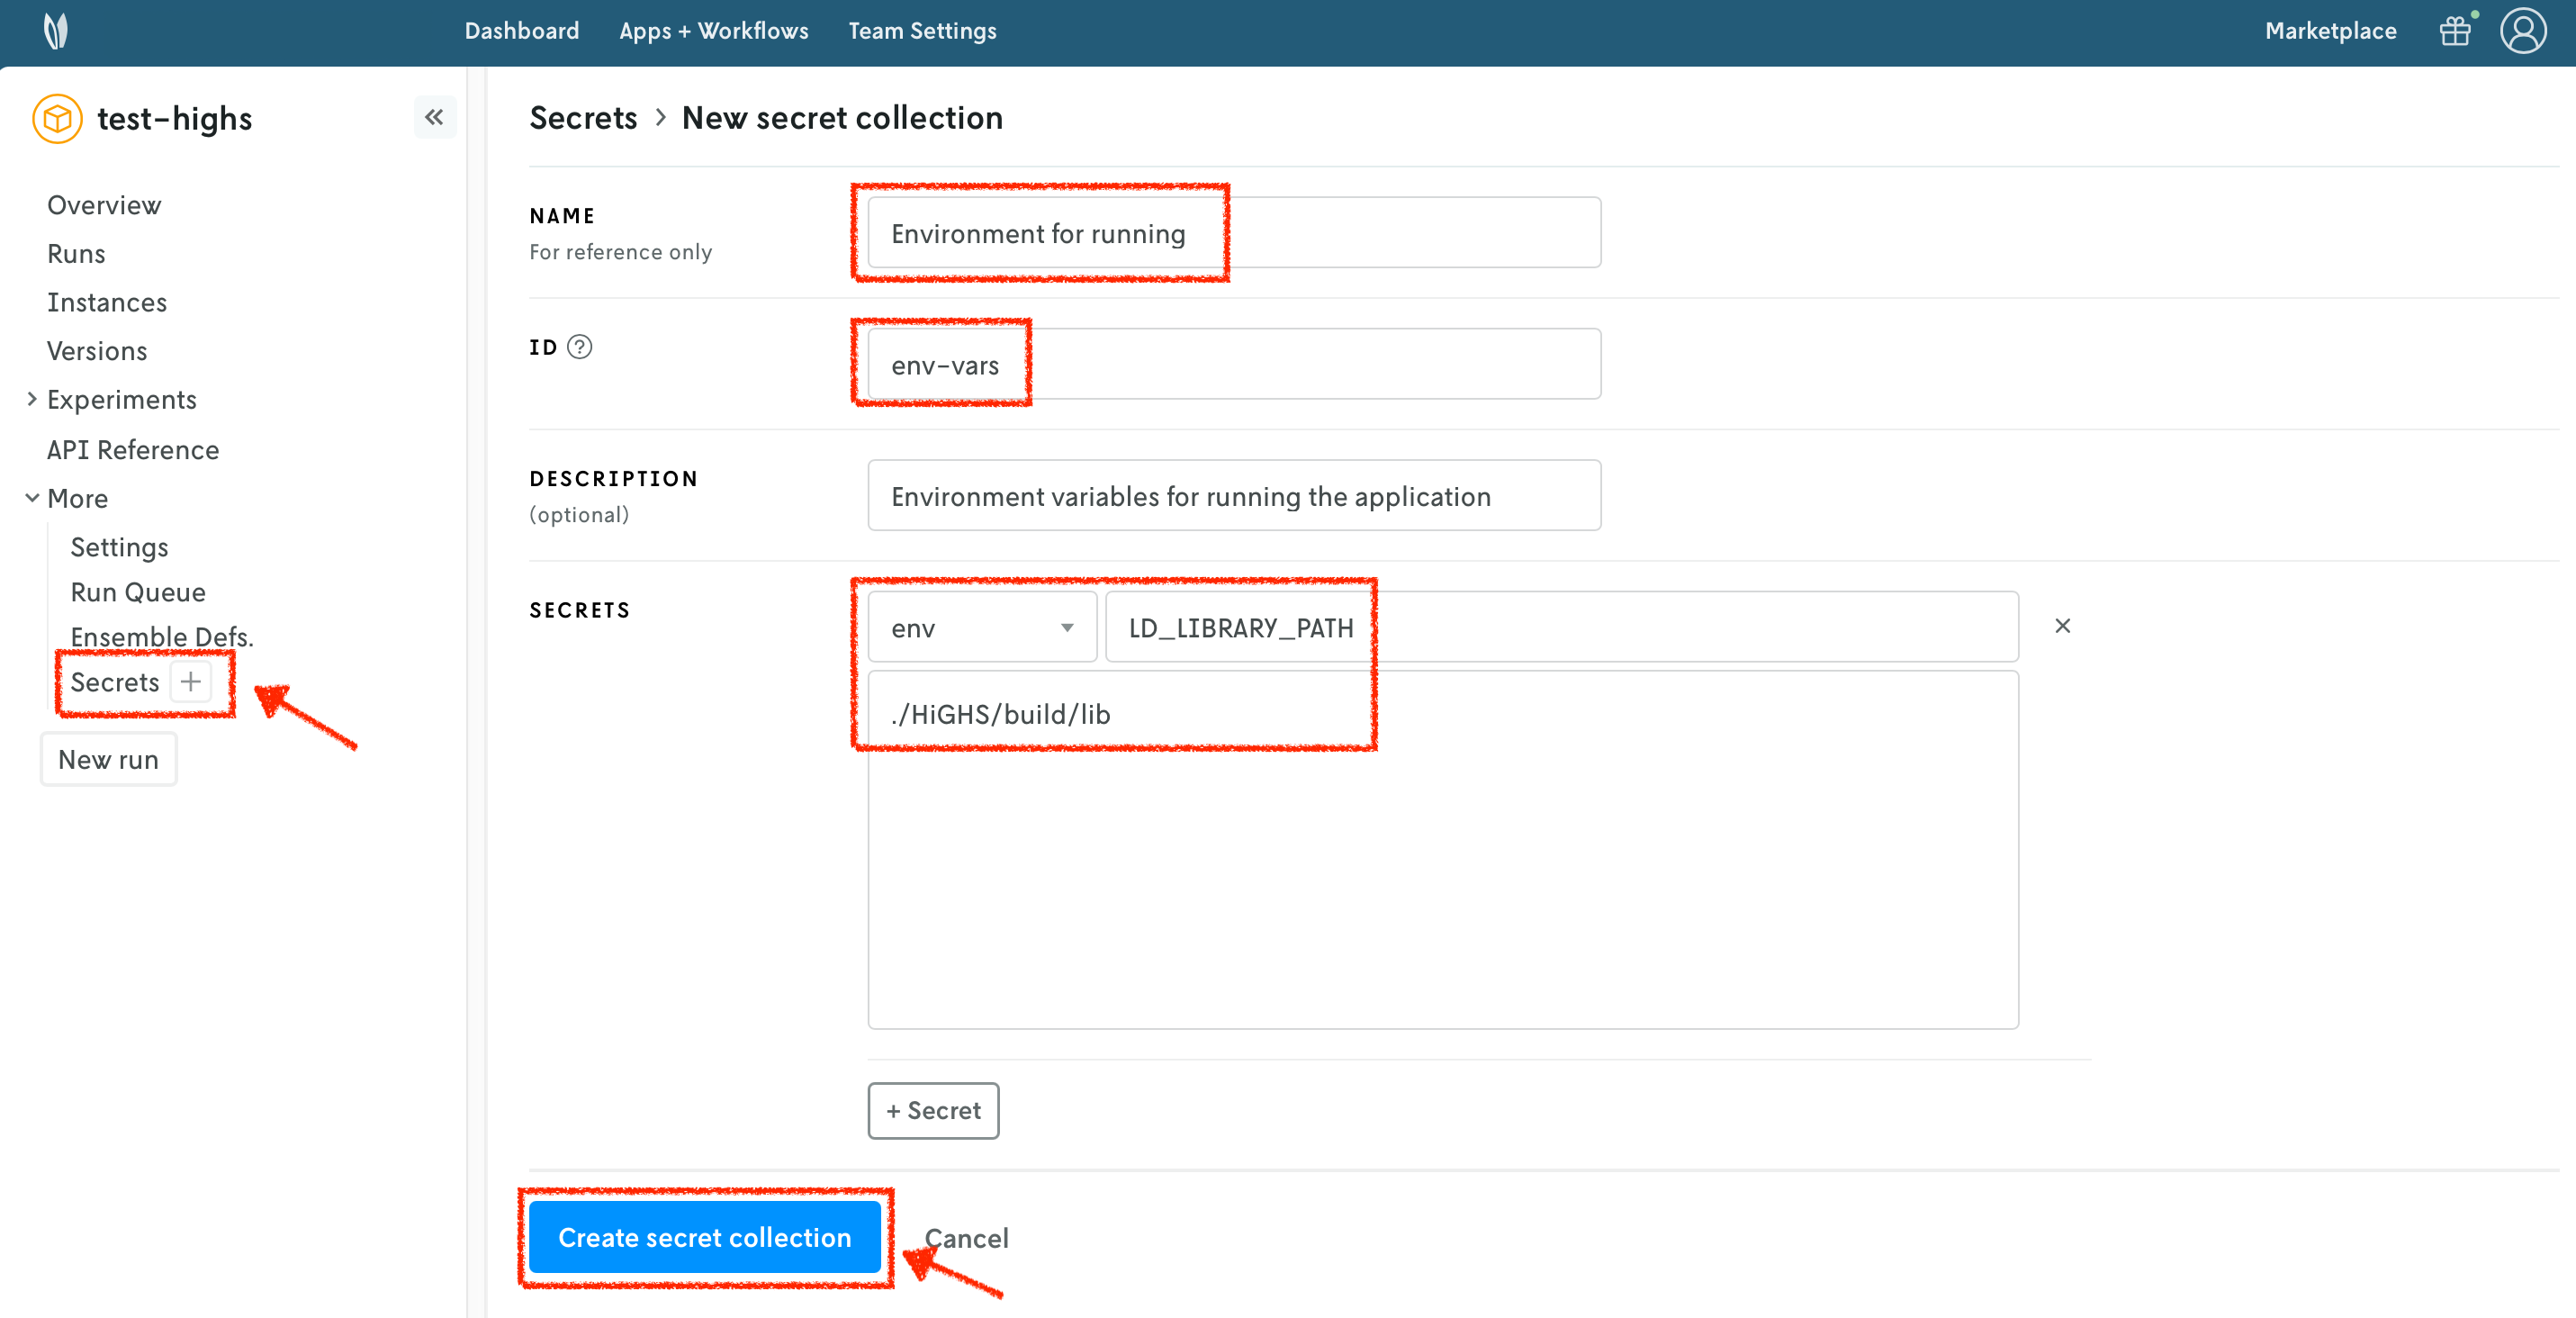
For OR-Tools, there are no special requirements to run. For HiGHS, however, you need to specify the LD_LIBRARY_PATH environment variable, so that the application can find the required shared libraries. To achieve this, you can use secrets collections, which allow you to specify special files or environment variables to be used when running your application.
To create a secrets collection, follow these steps:
- Select the
Secretssection of your application. - Press the
+button to create a new secrets collection. - Specify a name for your secrets collection.
- Assign an ID to your secrets collection.
- You can optionally provide a description.
- Add a new
envsecret type. TheSecret locationis the name of the environment variable. TheSecret valueis the value of the environment variable. - Create the secrets collection.
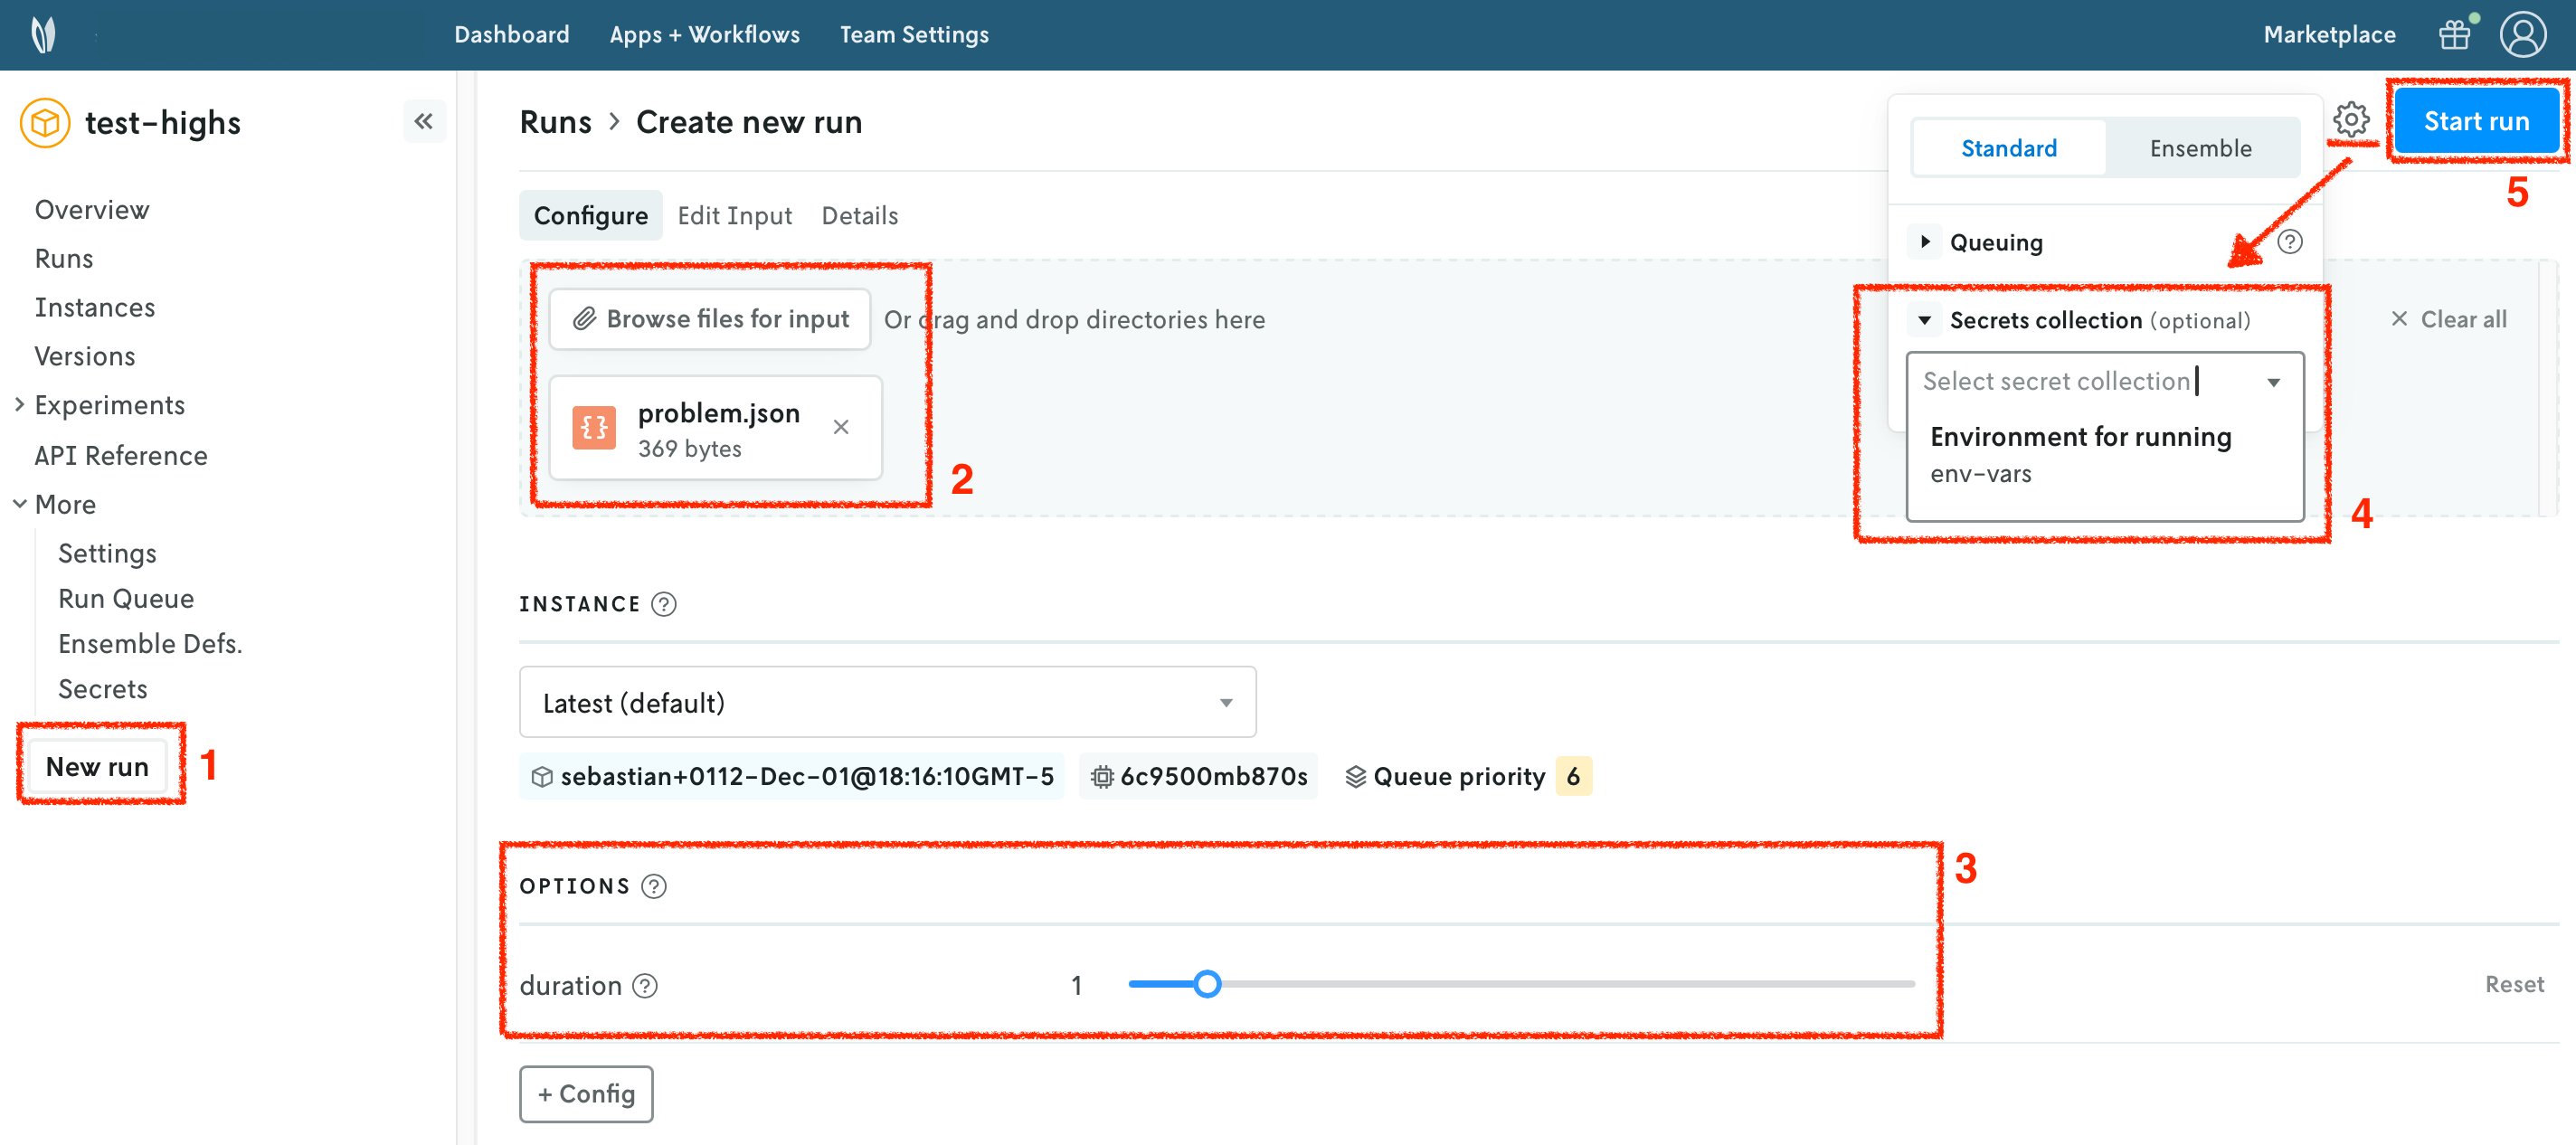
In the Nextmv Console, in the app overview page:
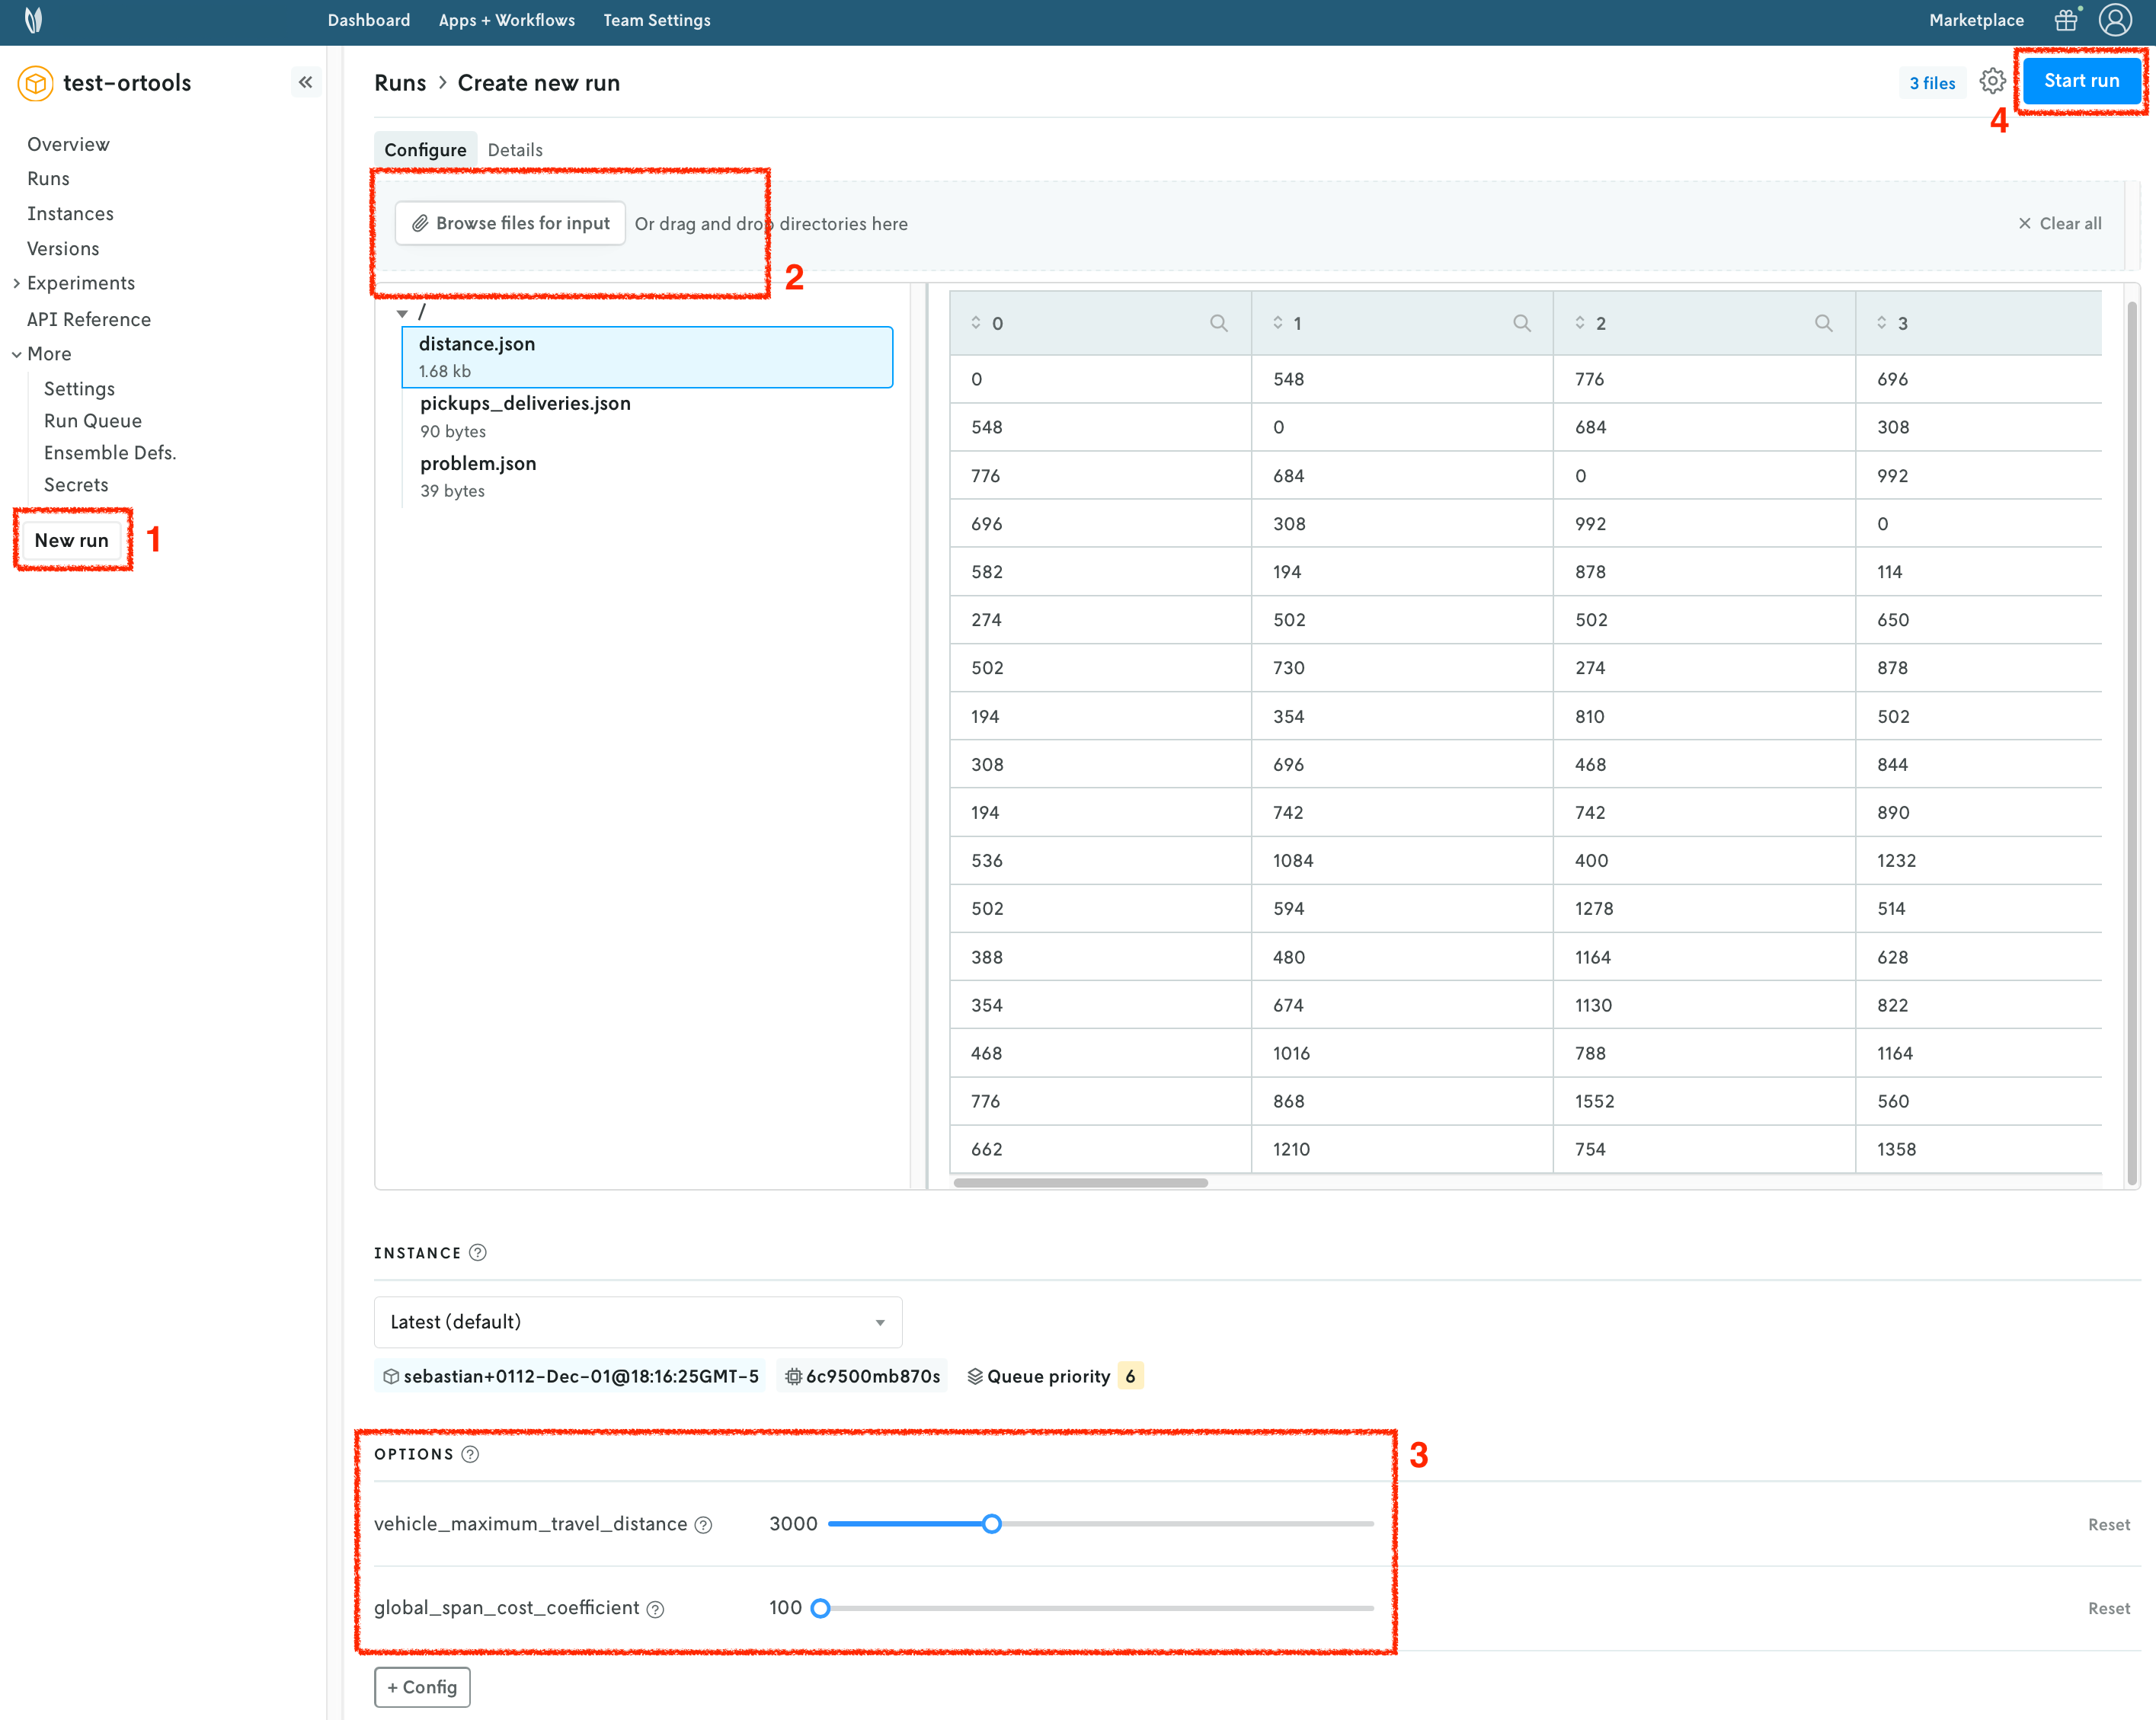
- Press the
New runbutton. - Drop the data files that you want to use. You will get a preview of the data.
- For HiGHS, use the
problem.jsonfile. - For OR-Tools, use the
distance.json,pickups_deliveries.json, andproblem.jsonfiles.
- For HiGHS, use the
- Configure your run according to the options that are set in the
app.yamlmanifest.- For HiGHS, you can configure the
duration. - For OR-Tools, you can configure the
vehicle_maximum_travel_distanceand theglobal_span_cost_coefficient.
- For HiGHS, you can configure the
- Configure the run settings.
- For HiGHS, select the secrets collection you created in the previous step.
- For OR-Tools, there is no special configuration needed.
- Start the run.
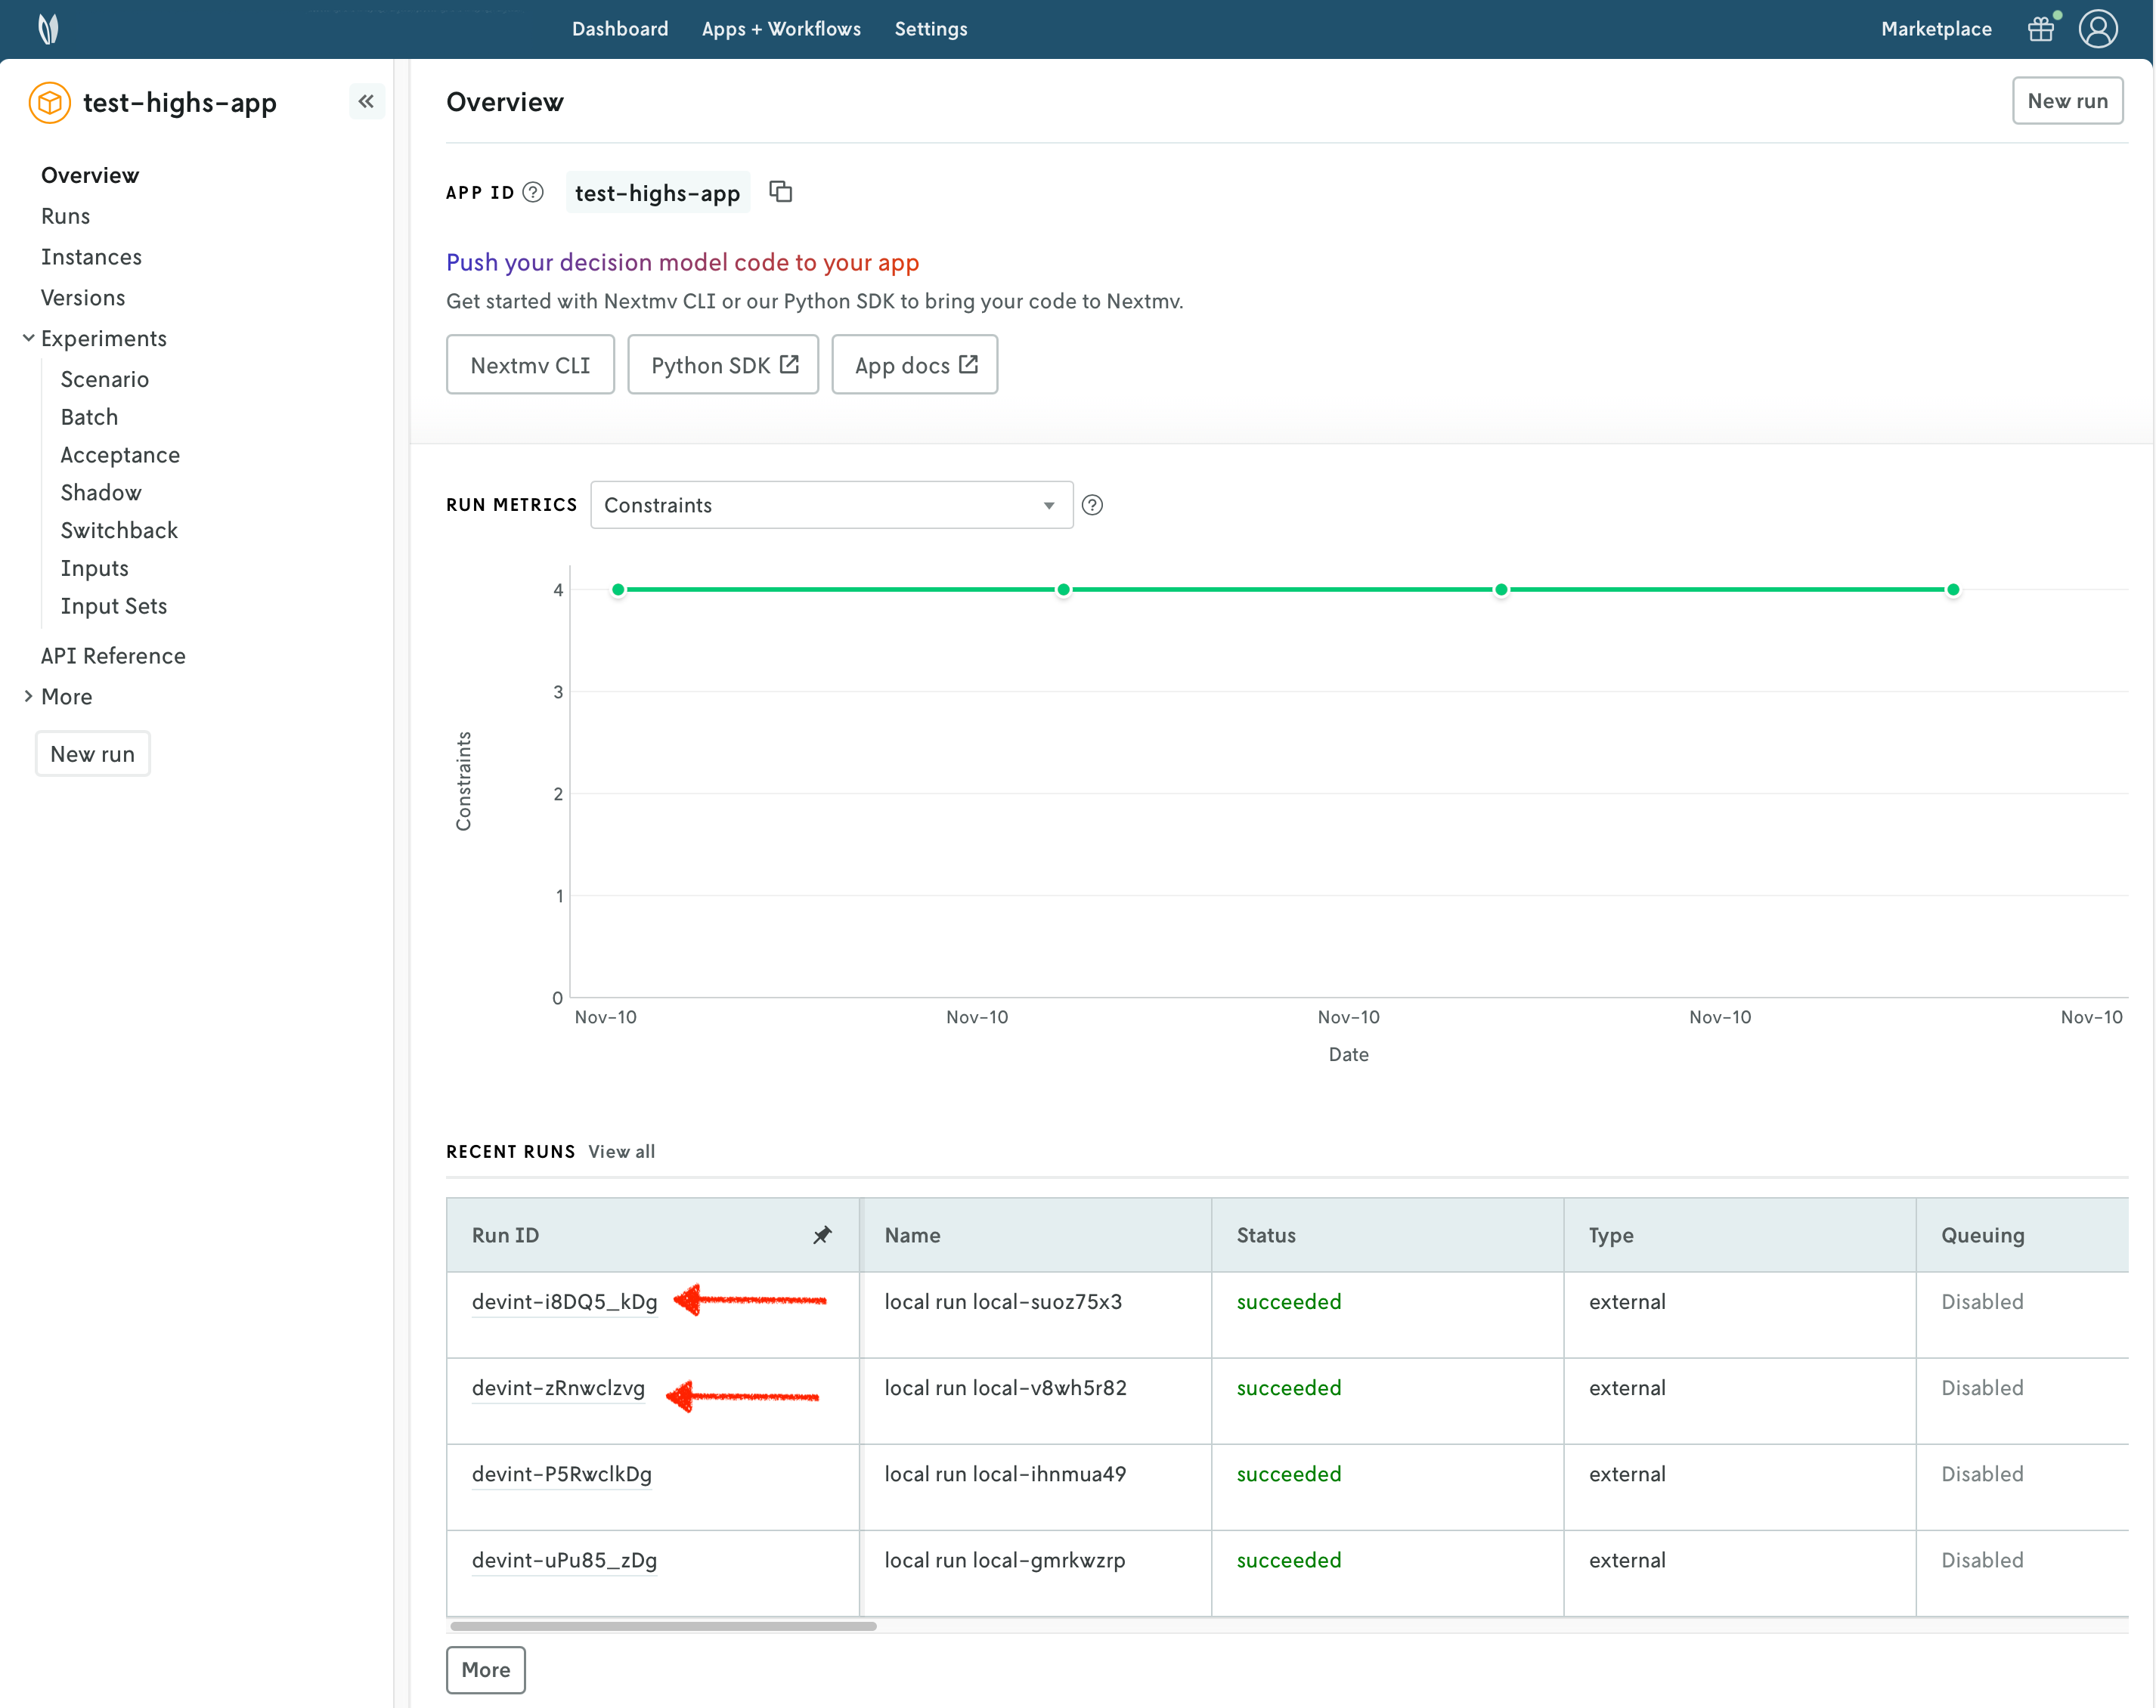
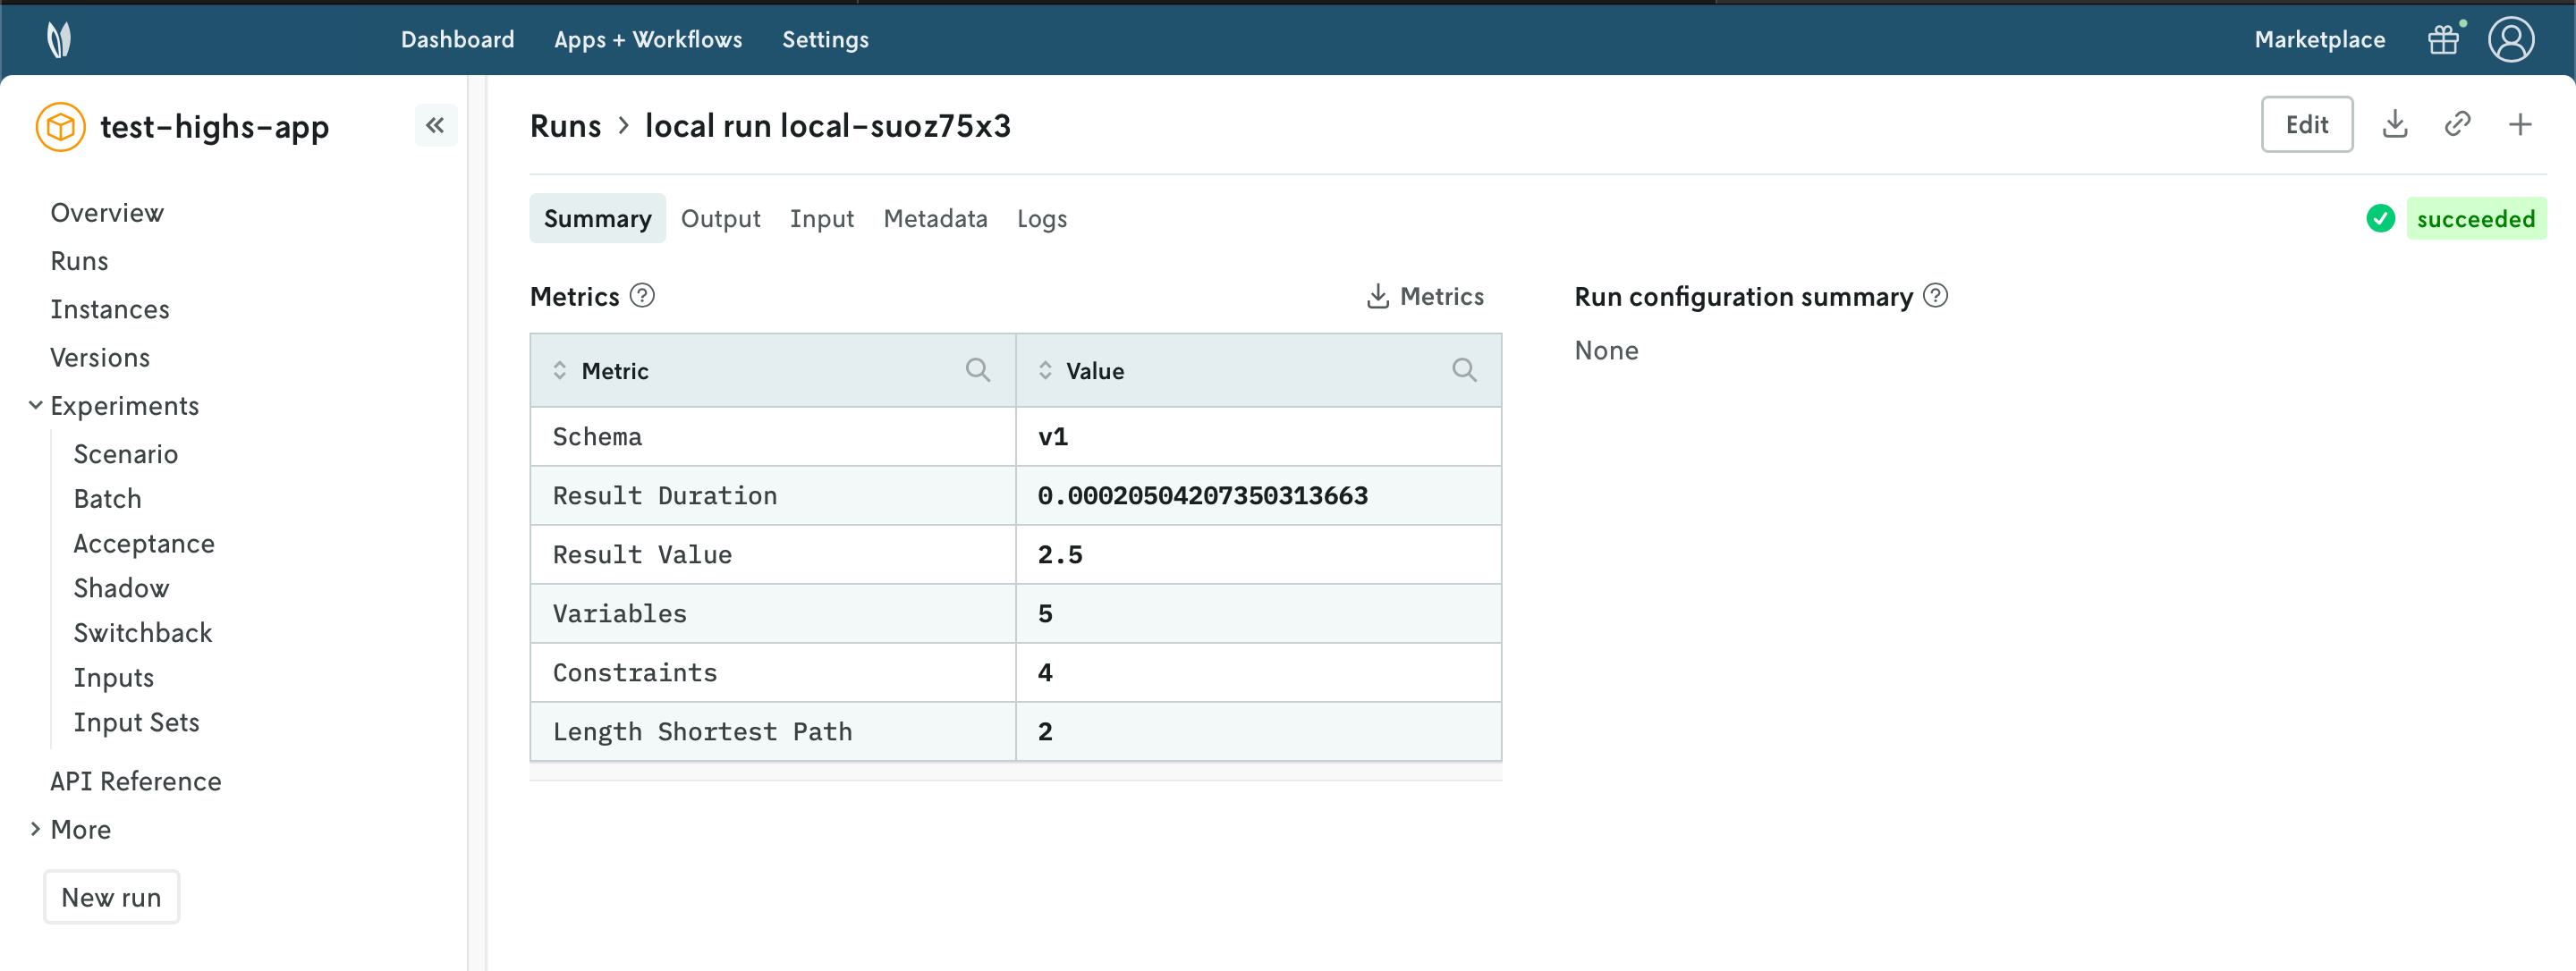
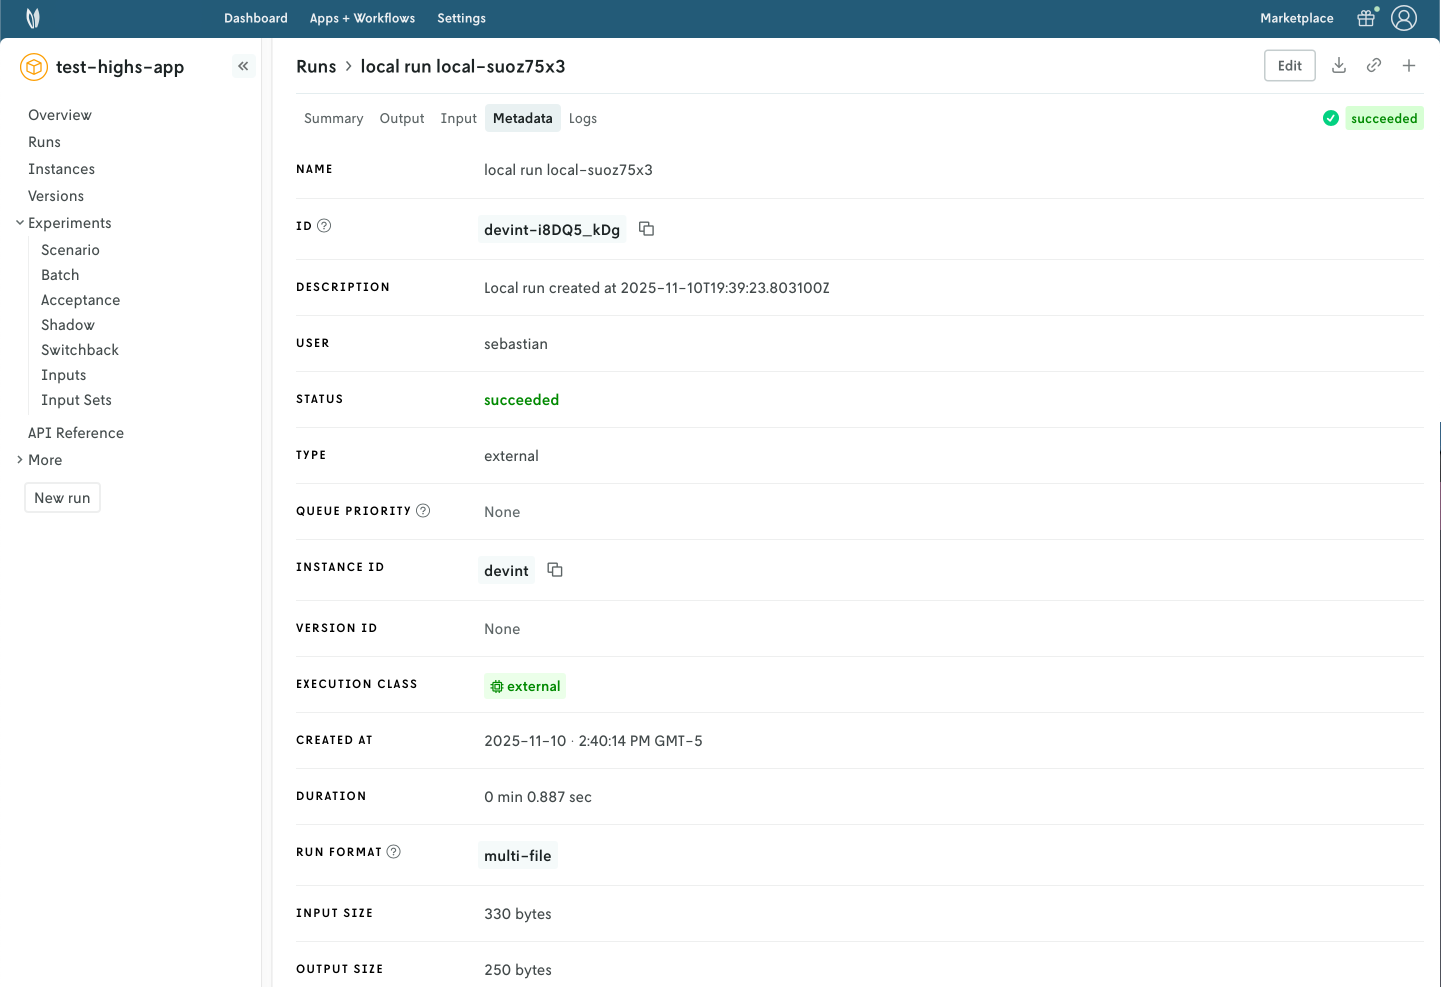
You can use the Nextmv Console to browse the information of the run:
- Summary
- Output
- Input
- Metadata
- Logs
Nextmv is built for collaboration, so you can invite team members to your account and share run URLs.
Alternatively, you can run your Nextmv application using the Nextmv CLI. Here is an example command for both applications.
This command is saved as app3.sh in the full tutorial code.
12. Perform a scenario test
We are going to take full advantage of the Nextmv Platform by creating a scenario test. Scenario tests are generally used as an exploratory test to understand the impacts to business metrics (or KPIs) on situations such as:
- Updating a model with a new feature, such as an additional constraint.
- Comparing how the same model performs in different conditions, such as low demand vs. high demand.
- Doing a sensitivity analysis to understand how the model behaves when changing a parameter.
Start by creating an input set. As the name suggests, it is a set of inputs, and it serves as a base so that we can perform runs varying one or more configurations (options). To create an input set, you have several options. For this tutorial, we will be using the Nextmv Console and CLI. You may follow these steps for both examples.
- Navigate to the
Input setssection. - Set a name for your input set.
- Use the
Instance + date rangecreation type given that we already have a few runs on thelatestinstance. - Create the input set.

Another option for creating the input set is using the Nextmv CLI. Here is an example command for both applications.
This command is saved as app4.sh in the full tutorial code.
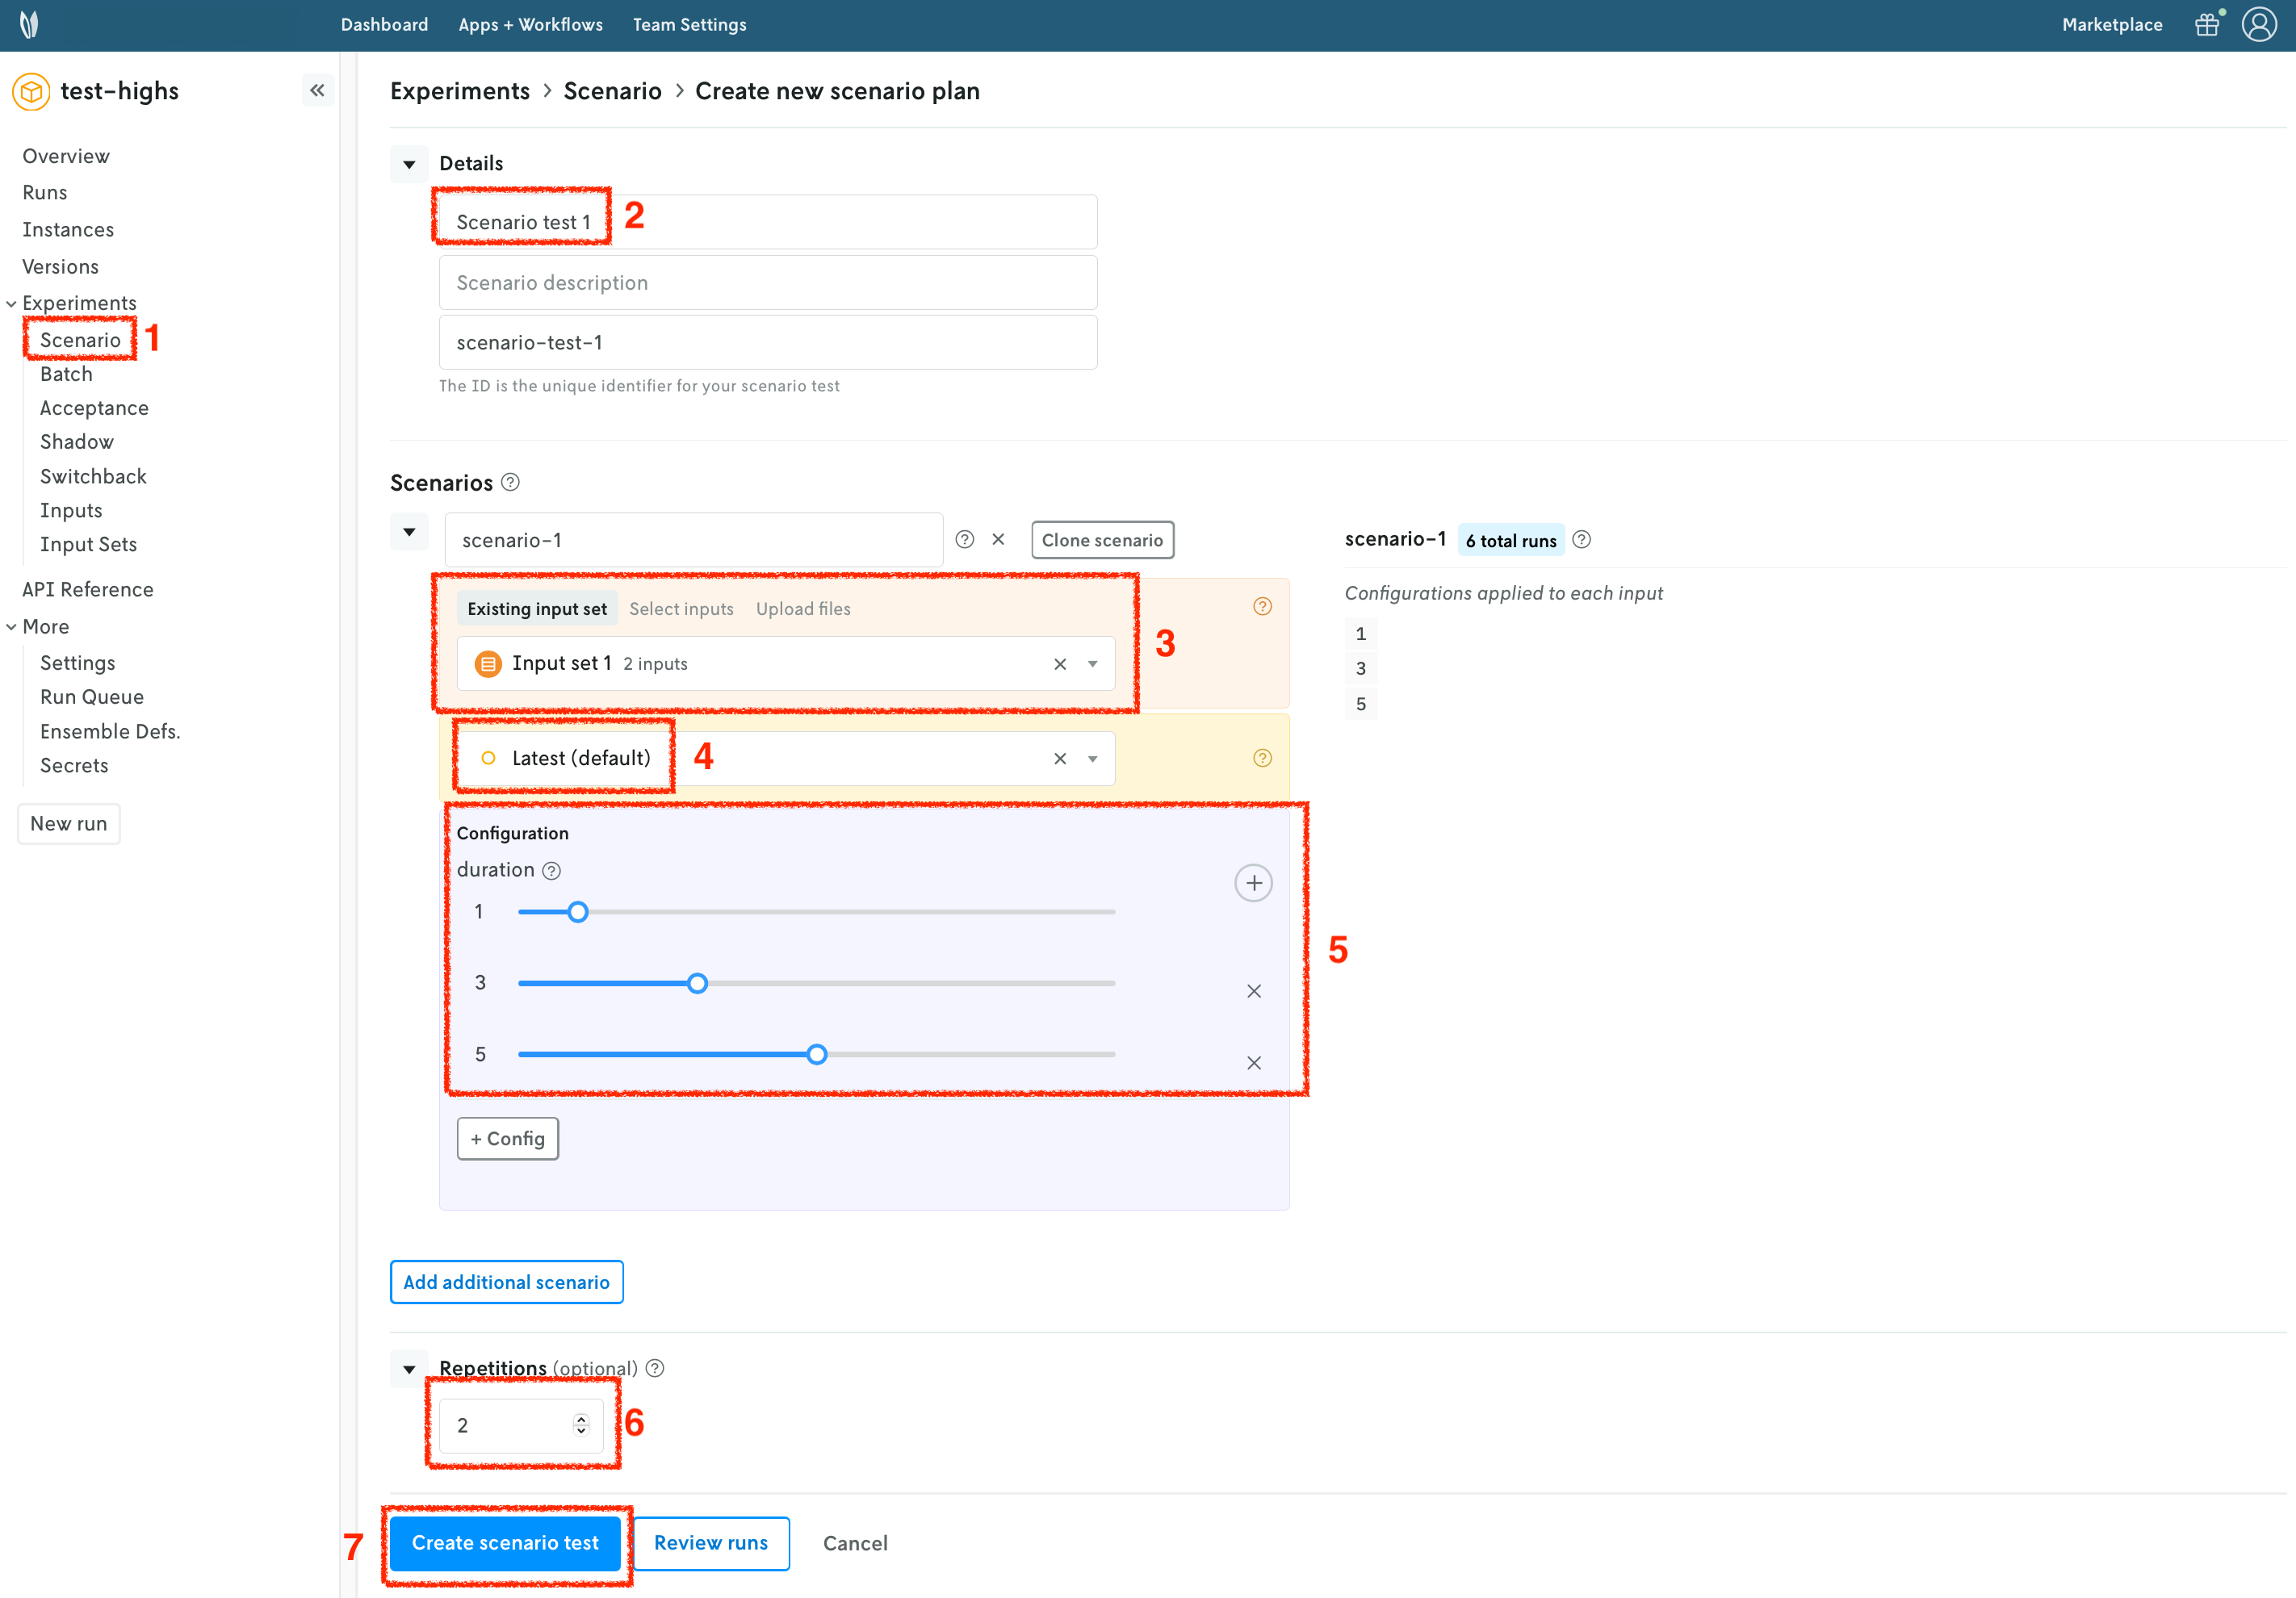
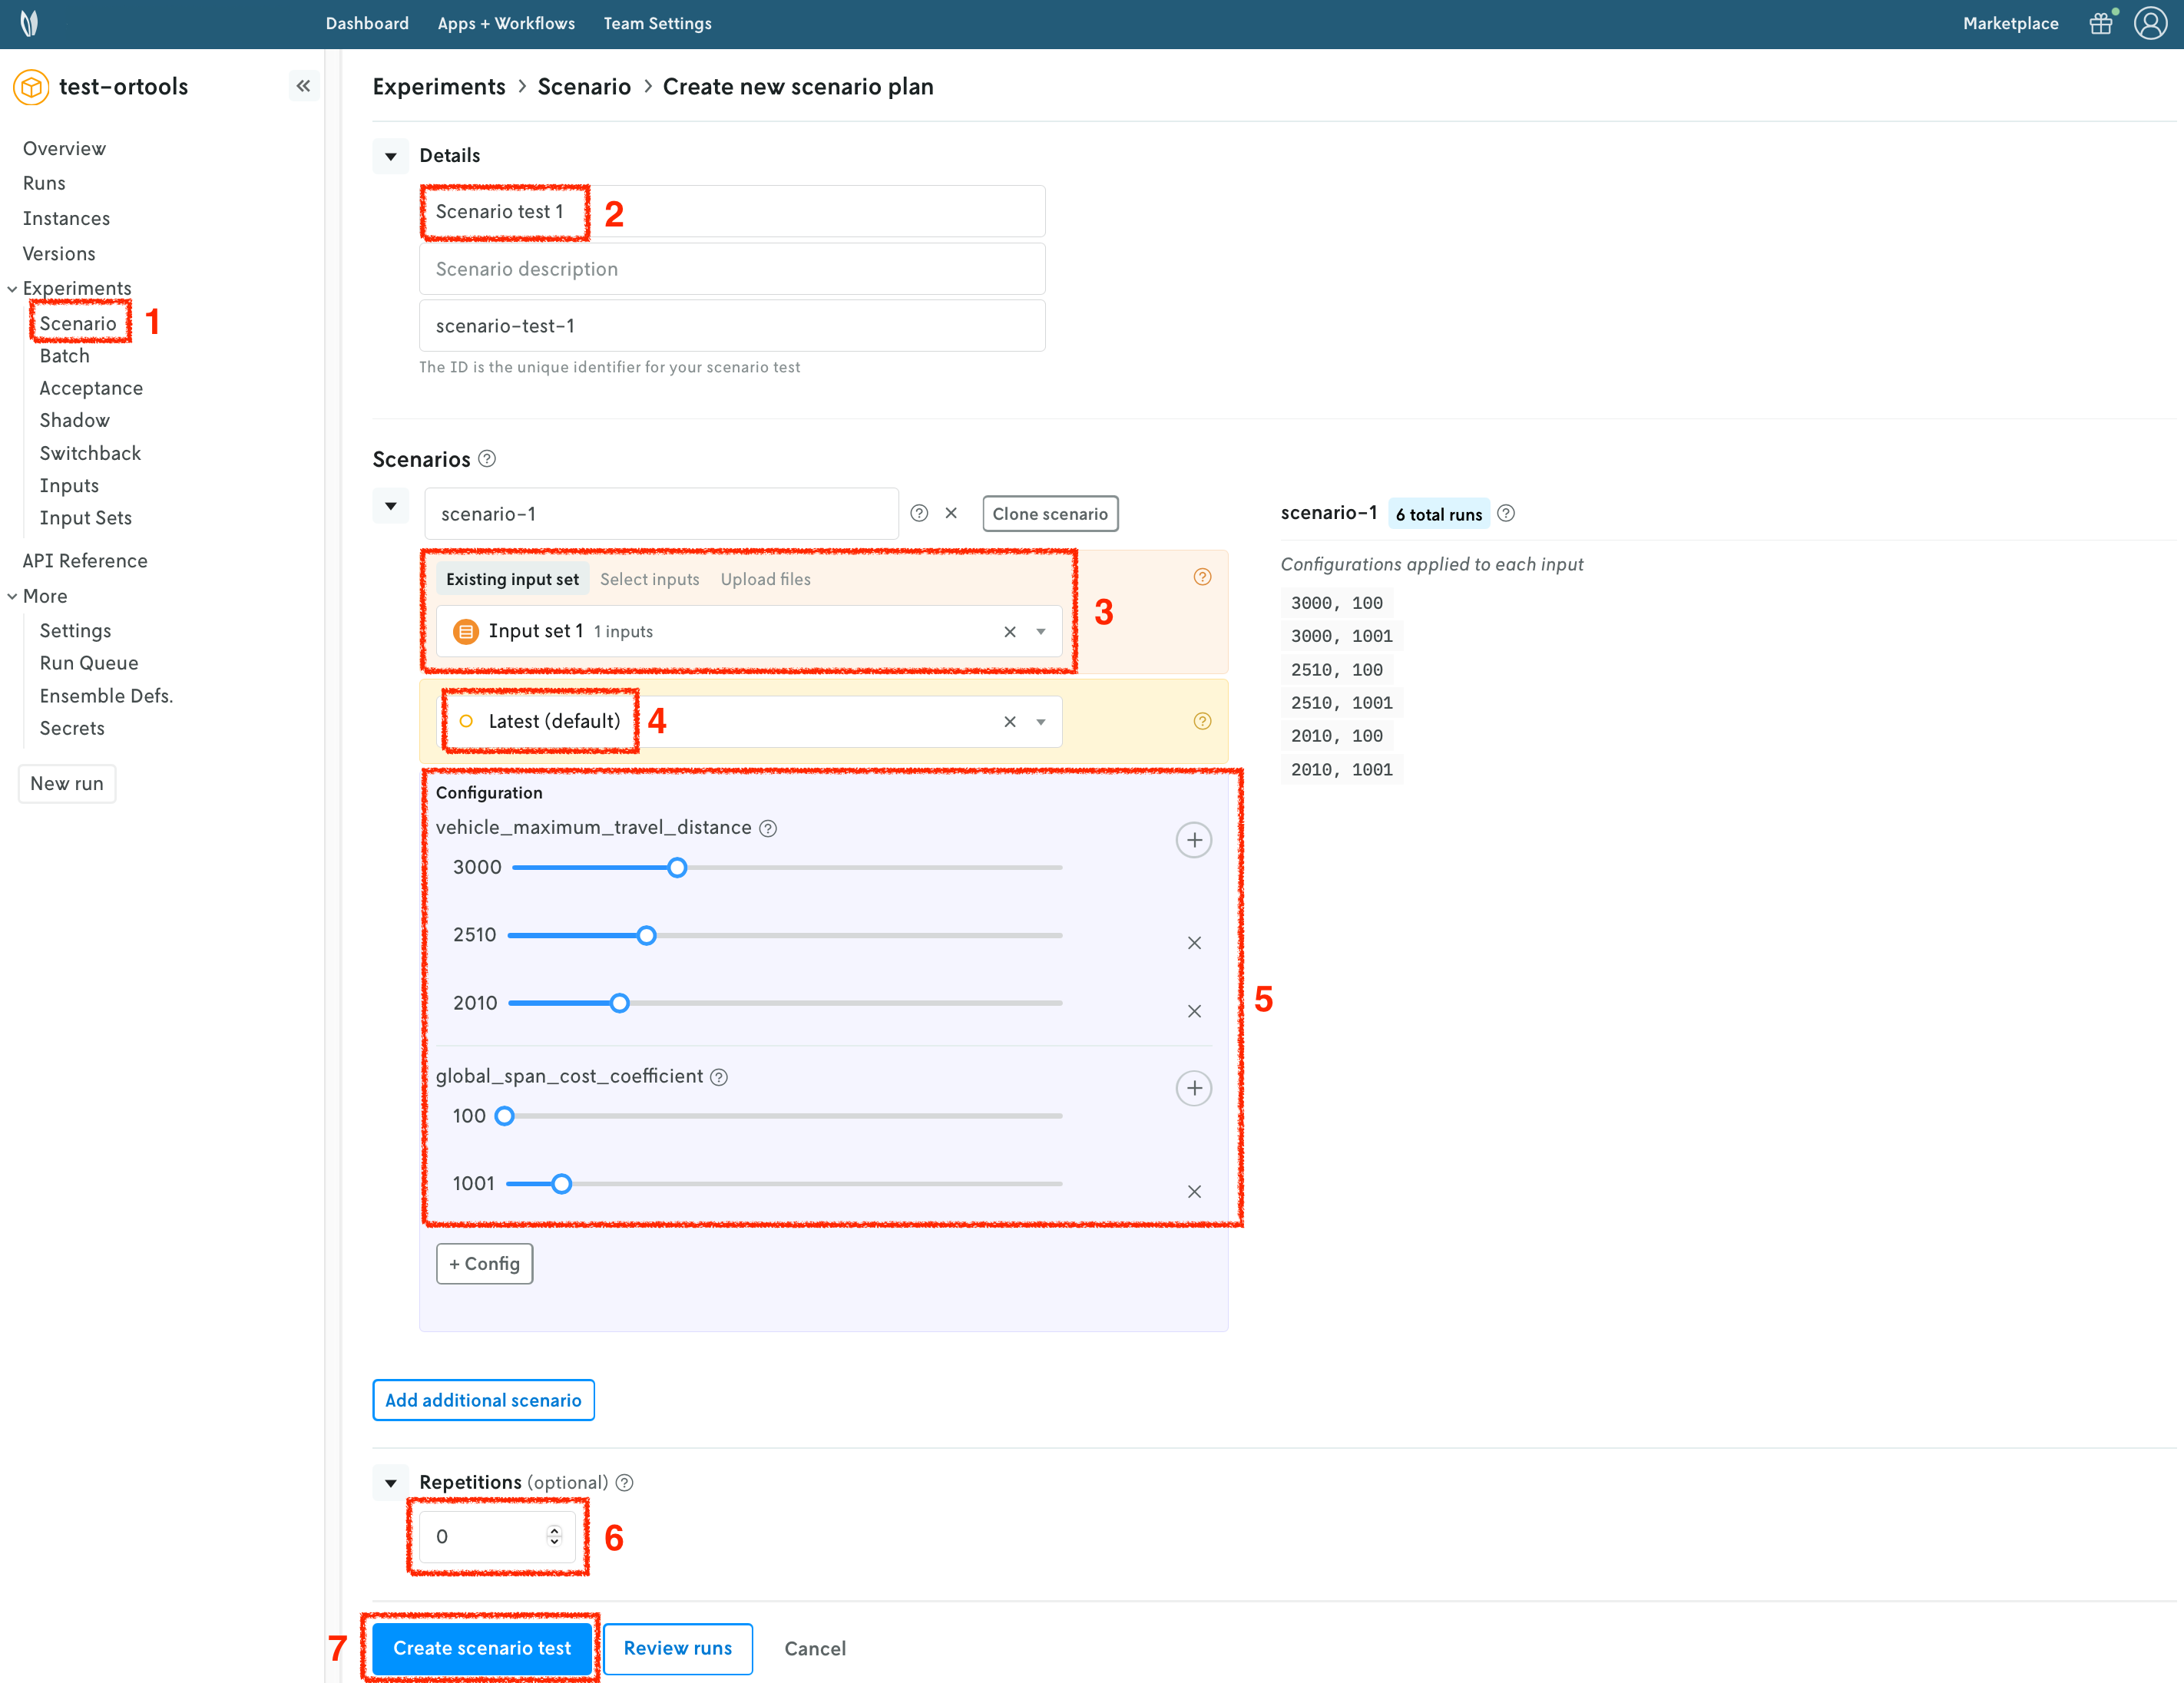
Once your input set has been created, we are going to create a scenario test. Similarly to runs and input sets, you may use the Console or CLI, amongst other options. We will continue to use the Nextmv Console in this tutorial. You may follow these steps for both examples.
- Navigate to the
Scenariosection. - Set a name for your scenario test.
- Select the input set you just created in the previous step.
- Select the
latestinstance. - Create configuration combinations, which will be factored in to create the scenarios.
- For HiGHS, we are setting
durationto be 1, 3, and 5 seconds. - For OR-Tools, we are setting
vehicle_maximum_travel_distanceto be 3000, 2510, and 2010; andglobal_span_cost_coefficientto be 100, and 1001.
- For HiGHS, we are setting
- Optionally, you may configure repetitions. These are useful when the results are not deterministic.
- Create the scenario test. Review and confirm the number of scenarios that will be created.
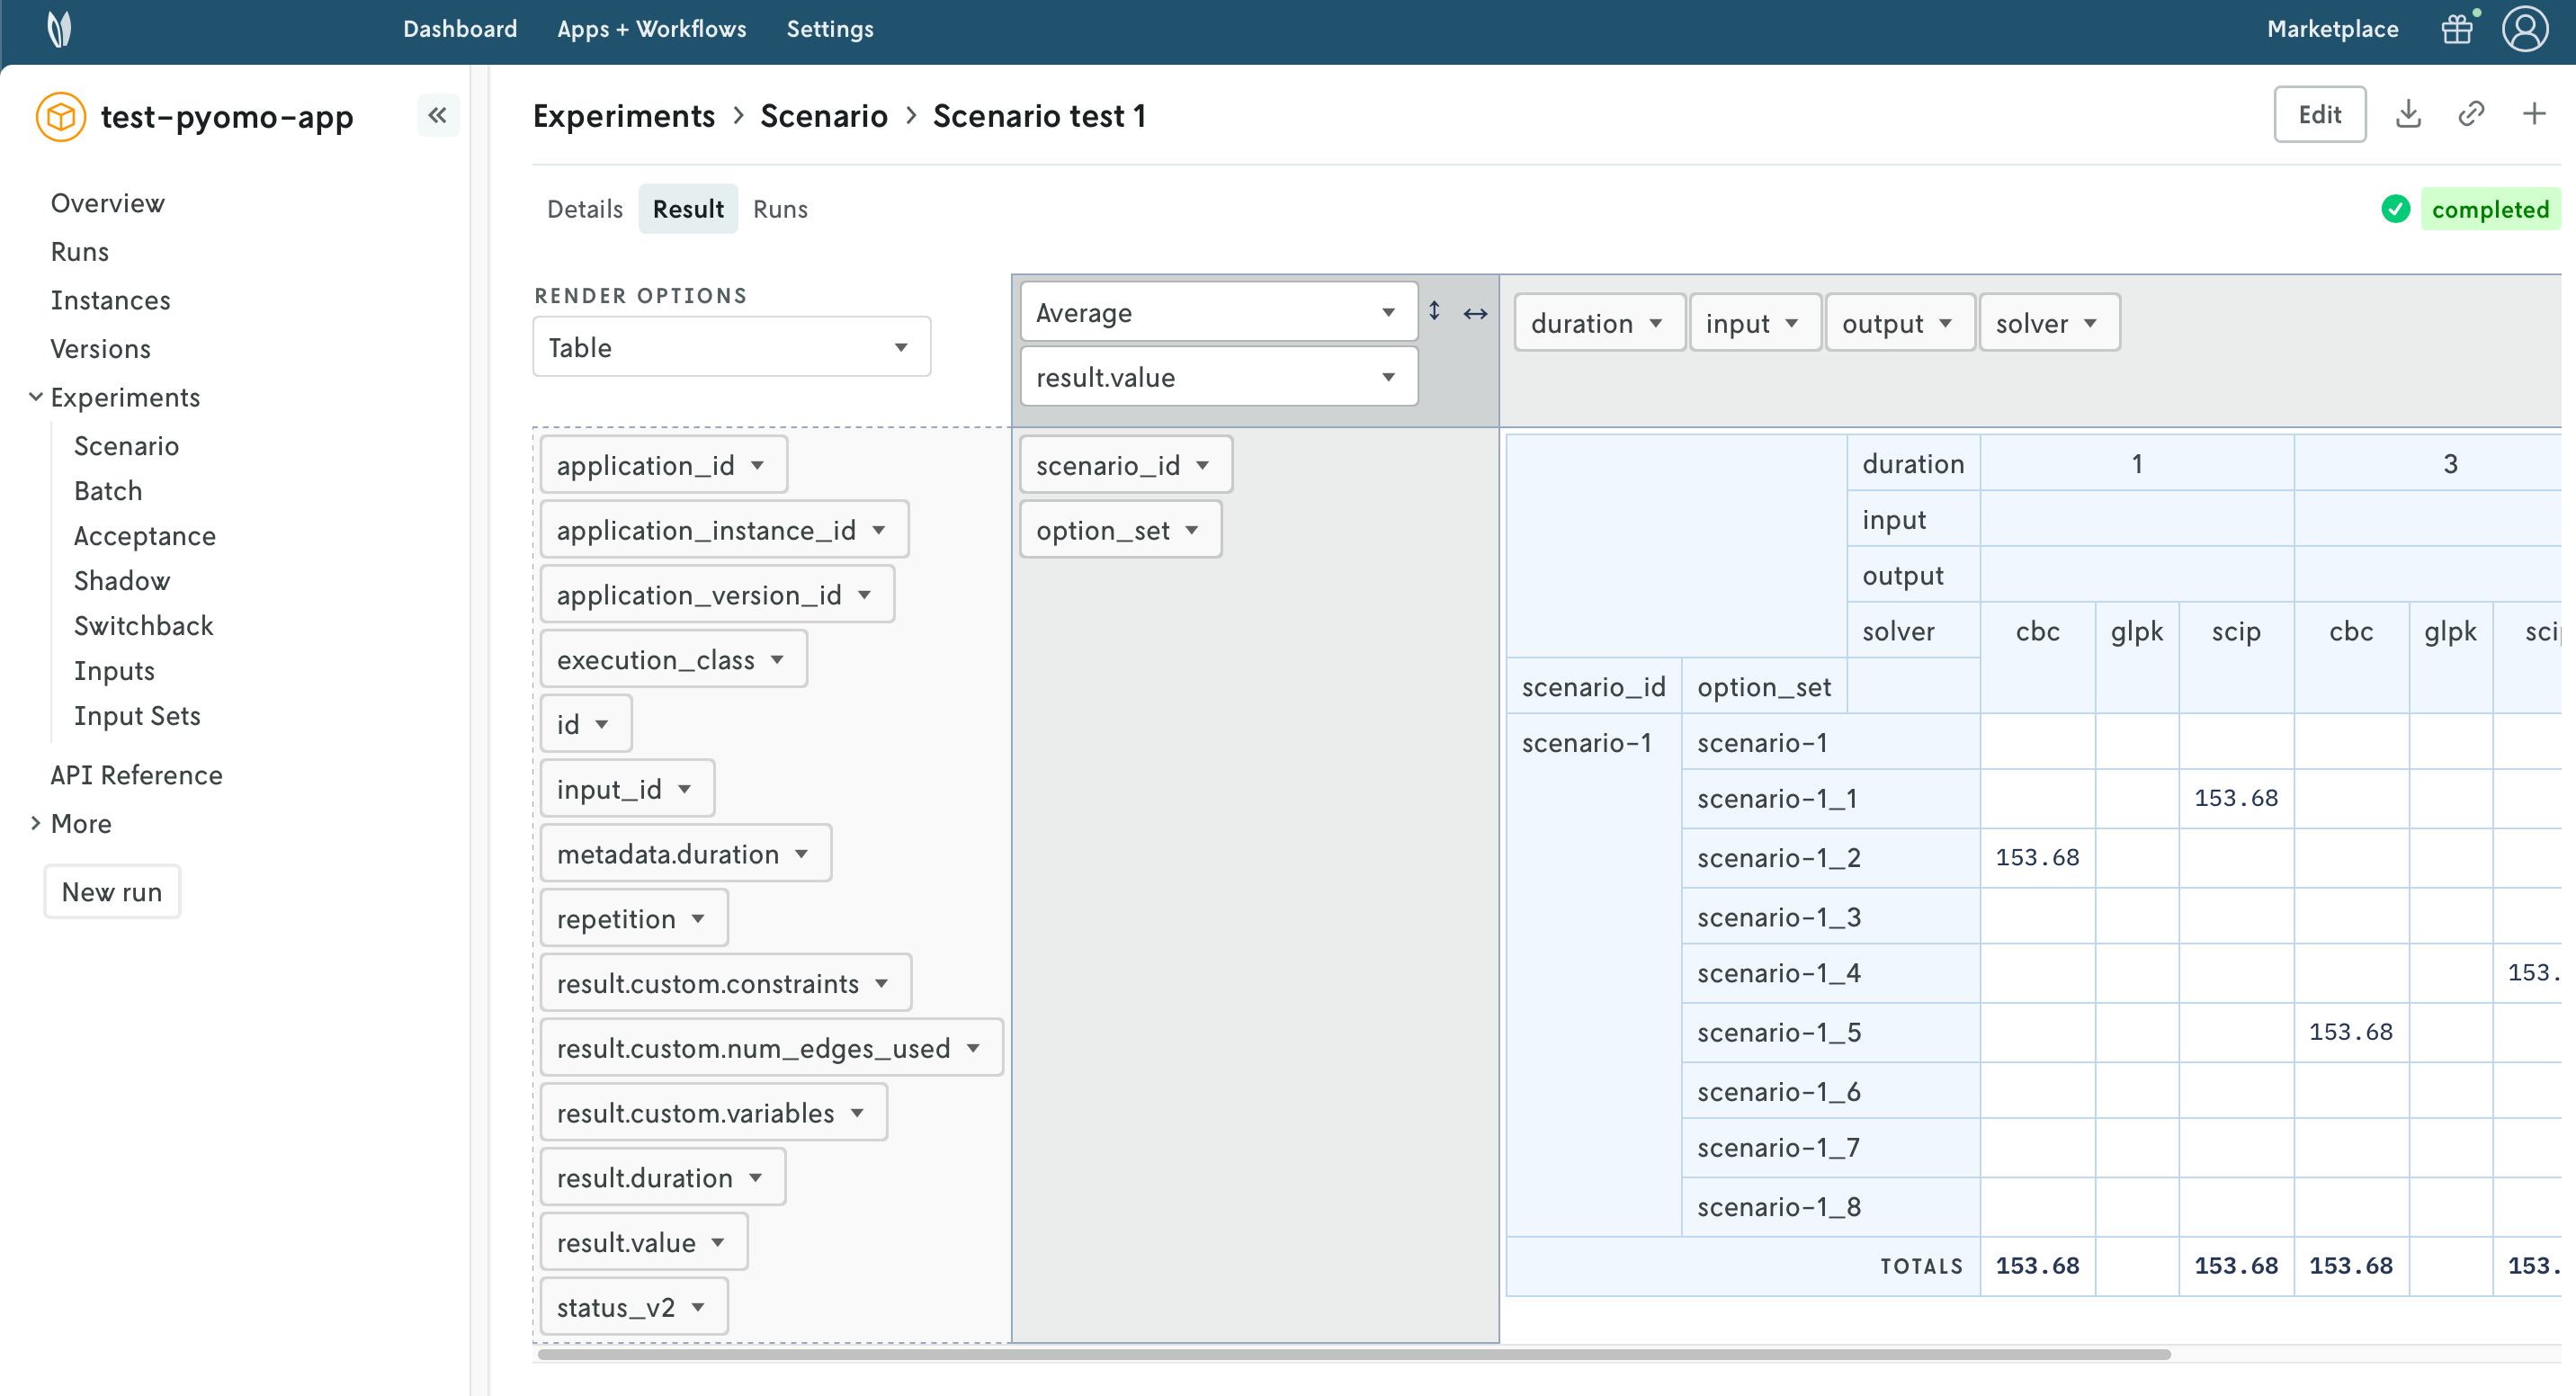
Once all the runs in the scenario test are completed, you can visualize the result of the test. A pivot table is provided to create useful comparisons of your metrics (statistics) across the scenario test runs.
🎉🎉🎉 Congratulations, you have finished this tutorial!
Full tutorial code
You can find the consolidated code examples used in this tutorial in the tutorials GitHub repository. The connect-your-model-cli dir contains all the code that was shown in this tutorial.
For each of the examples, you will find two directories:
original: the original example without any modifications.nextmv-ified: the example converted into a Nextmv application.
Go into each directory for instructions about running the decision model.