Connect your Pyomo model to Nextmv for DecisionOps: A step-by-step guide

Developing, testing, or managing Pyomo models? Connect your Pyomo model to the Nextmv platform for streamlined development, simple deployment, built-in testing, and collaboration.

Accelerate the development of your Pyomo model and manage it in production with Nextmv. Pyomo is a Python-based, open source library that supports many solvers and is used to model a wide range of optimization problems, such as energy generation, inventory management, and scheduling. Nextmv is a DecisionOps platform that serves as the speed and trust layer for your optimization models. 

In this blog post, we’ll walk through how to connect a Pyomo model to Nextmv’s DecisionOps to develop quickly, deploy safely, and scale to many use cases. What’s a DecisionOps platform? DecisionOps, like MLOps for optimization, brings transparency and standardization to the decision modeling process – from development to managing models in production.

  • Observability. Create and share a system of record for your model. See when it was last updated and by whom. Dive into details of each run, including input, output, metadata, and logs. 
  • Experimentation. Answer what-if questions like, “What happens if I switch the solver?” or “How does changing this constraint affect costs?" 
  • Orchestration. Connect models (e.g., routing, scheduling) and data sources (e.g., Databricks, Snowflake) to create end-to-end decision workflows. 
  • Collaboration. Create a shared space for all of your optimization projects and get buy-in from stakeholders.

Without DecisionOps, data science and optimization teams often need months instead of weeks to deploy new models and updates, significant amounts of ongoing engineering support, and face challenges in getting stakeholder buy-in. 

A Pyomo example

In this guide, we’ll look at the classic “diet problem” from Pyomo with the objective of minimizing the total cost of food while satisfying daily nutritional requirements. In addition to solving this problem, we also want to know if using different solvers or changing a constraint (e.g., limiting dairy) impacts the total cost? Here’s how we’ll connect the model to Nextmv and find answers to our “what if” questions:

  • First, we’ll run the Pyomo model locally with no changes (just to see how it works)
  • Next, we’ll push the Pyomo model as a decision app to the Nextmv platform for scalable, production-grade infrastructure
  • After our app is live, we’ll run the model remotely via the Nextmv UI
  • Then we’ll add options and statistics (metrics) to the decision app
  • Lastly, we’ll perform a scenario test using configurable options (e.g., solver and a constraint to limit dairy)

Let’s dive in! (And if you’d like a visual companion, check out this video walkthrough.)

Get started with Nextmv

But before we begin, let’s get your Nextmv account set up!

  1. Sign up for a Nextmv account: cloud.nextmv.io/signup
  2. Verify your account (via an email to the address you provided)
  3. Start a free trial of the Innovator plan by clicking “Upgrade” in the top right of the Nextmv UI and then selecting “Innovator” on the “Plans” page

Note: Ensure you have Python and pip installed

Set up the model and run it locally 

In this section, we’ll download the Pyomo project files and run the model locally on your machine.

Get the project files. Download the files from the “Pyomo example” folder in Google Drive. (It’ll probably zip them up when you download the whole folder.)

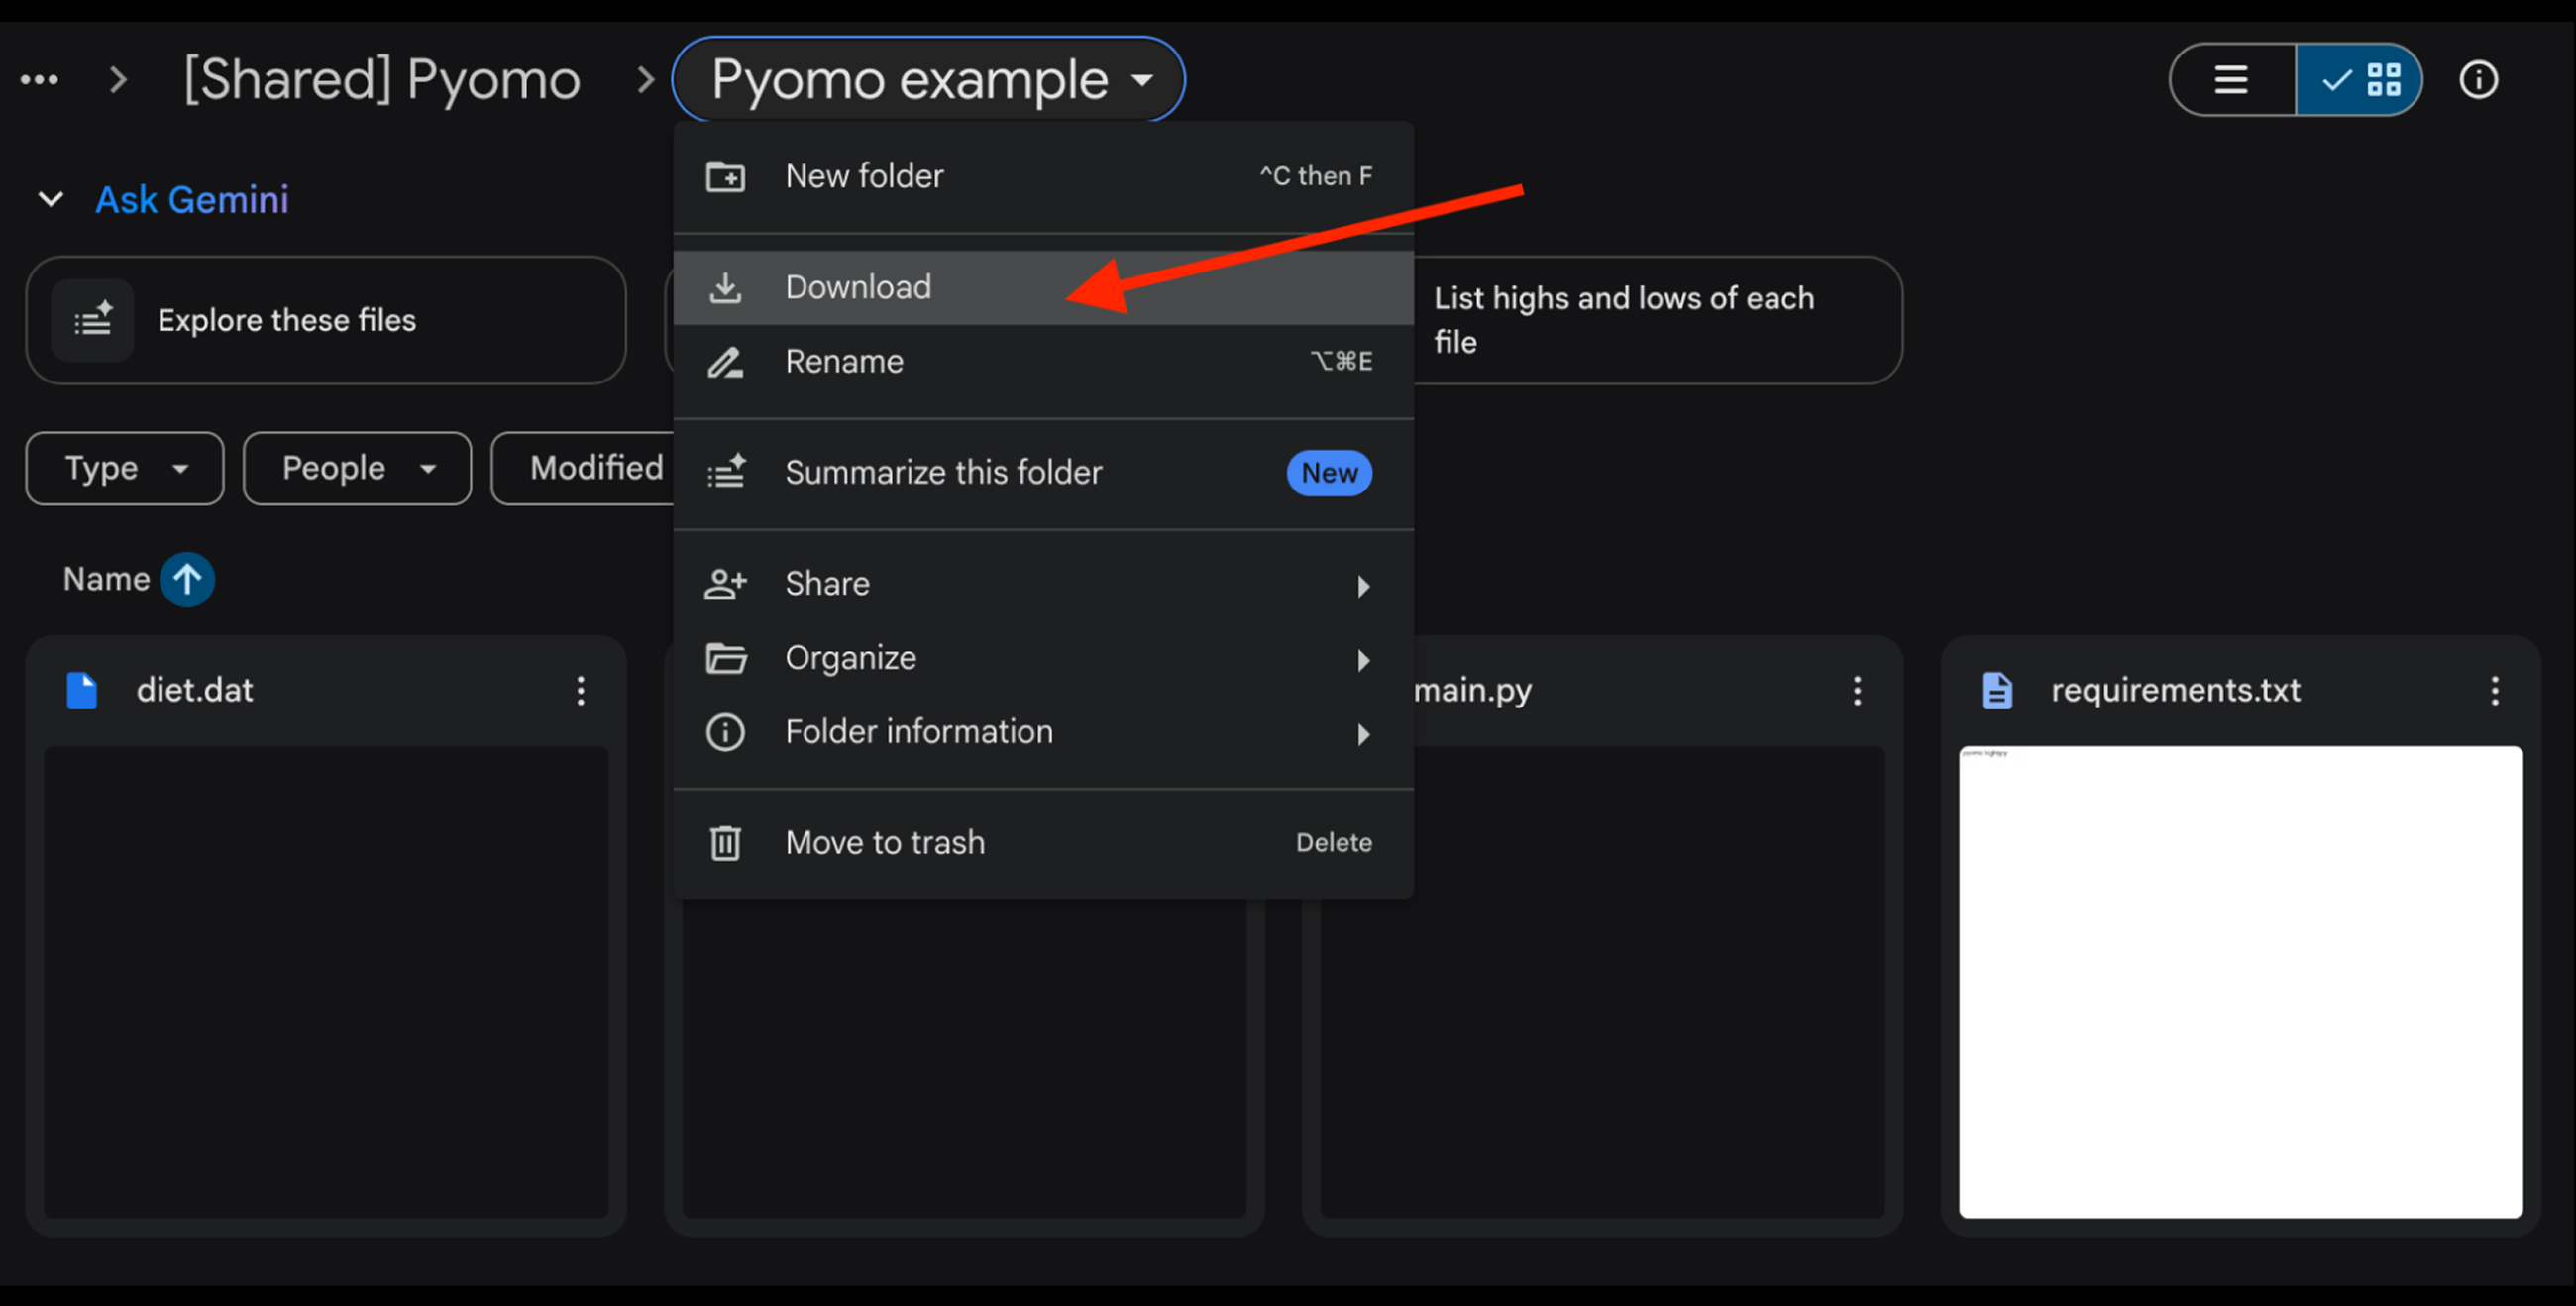
Put the following files in a directory named “pyomo-example” on your computer:

  • diet.dat
  • diet.py
  • main.py
  • requirements.txt

Install the requirements via terminal

Note: Make sure you’re in the pyomo-example directory you just created.

Note: You may need to use “pip3” command depending on your setup


pip install -r requirements.txt

Run the Python file via terminal to execute the model

Note: You may need to use “python3” command depending on your setup


python main.py

Push the Pyomo model to Nextmv

In this section, we’ll walk through the steps required to connect the Pyomo model to Nextmv.

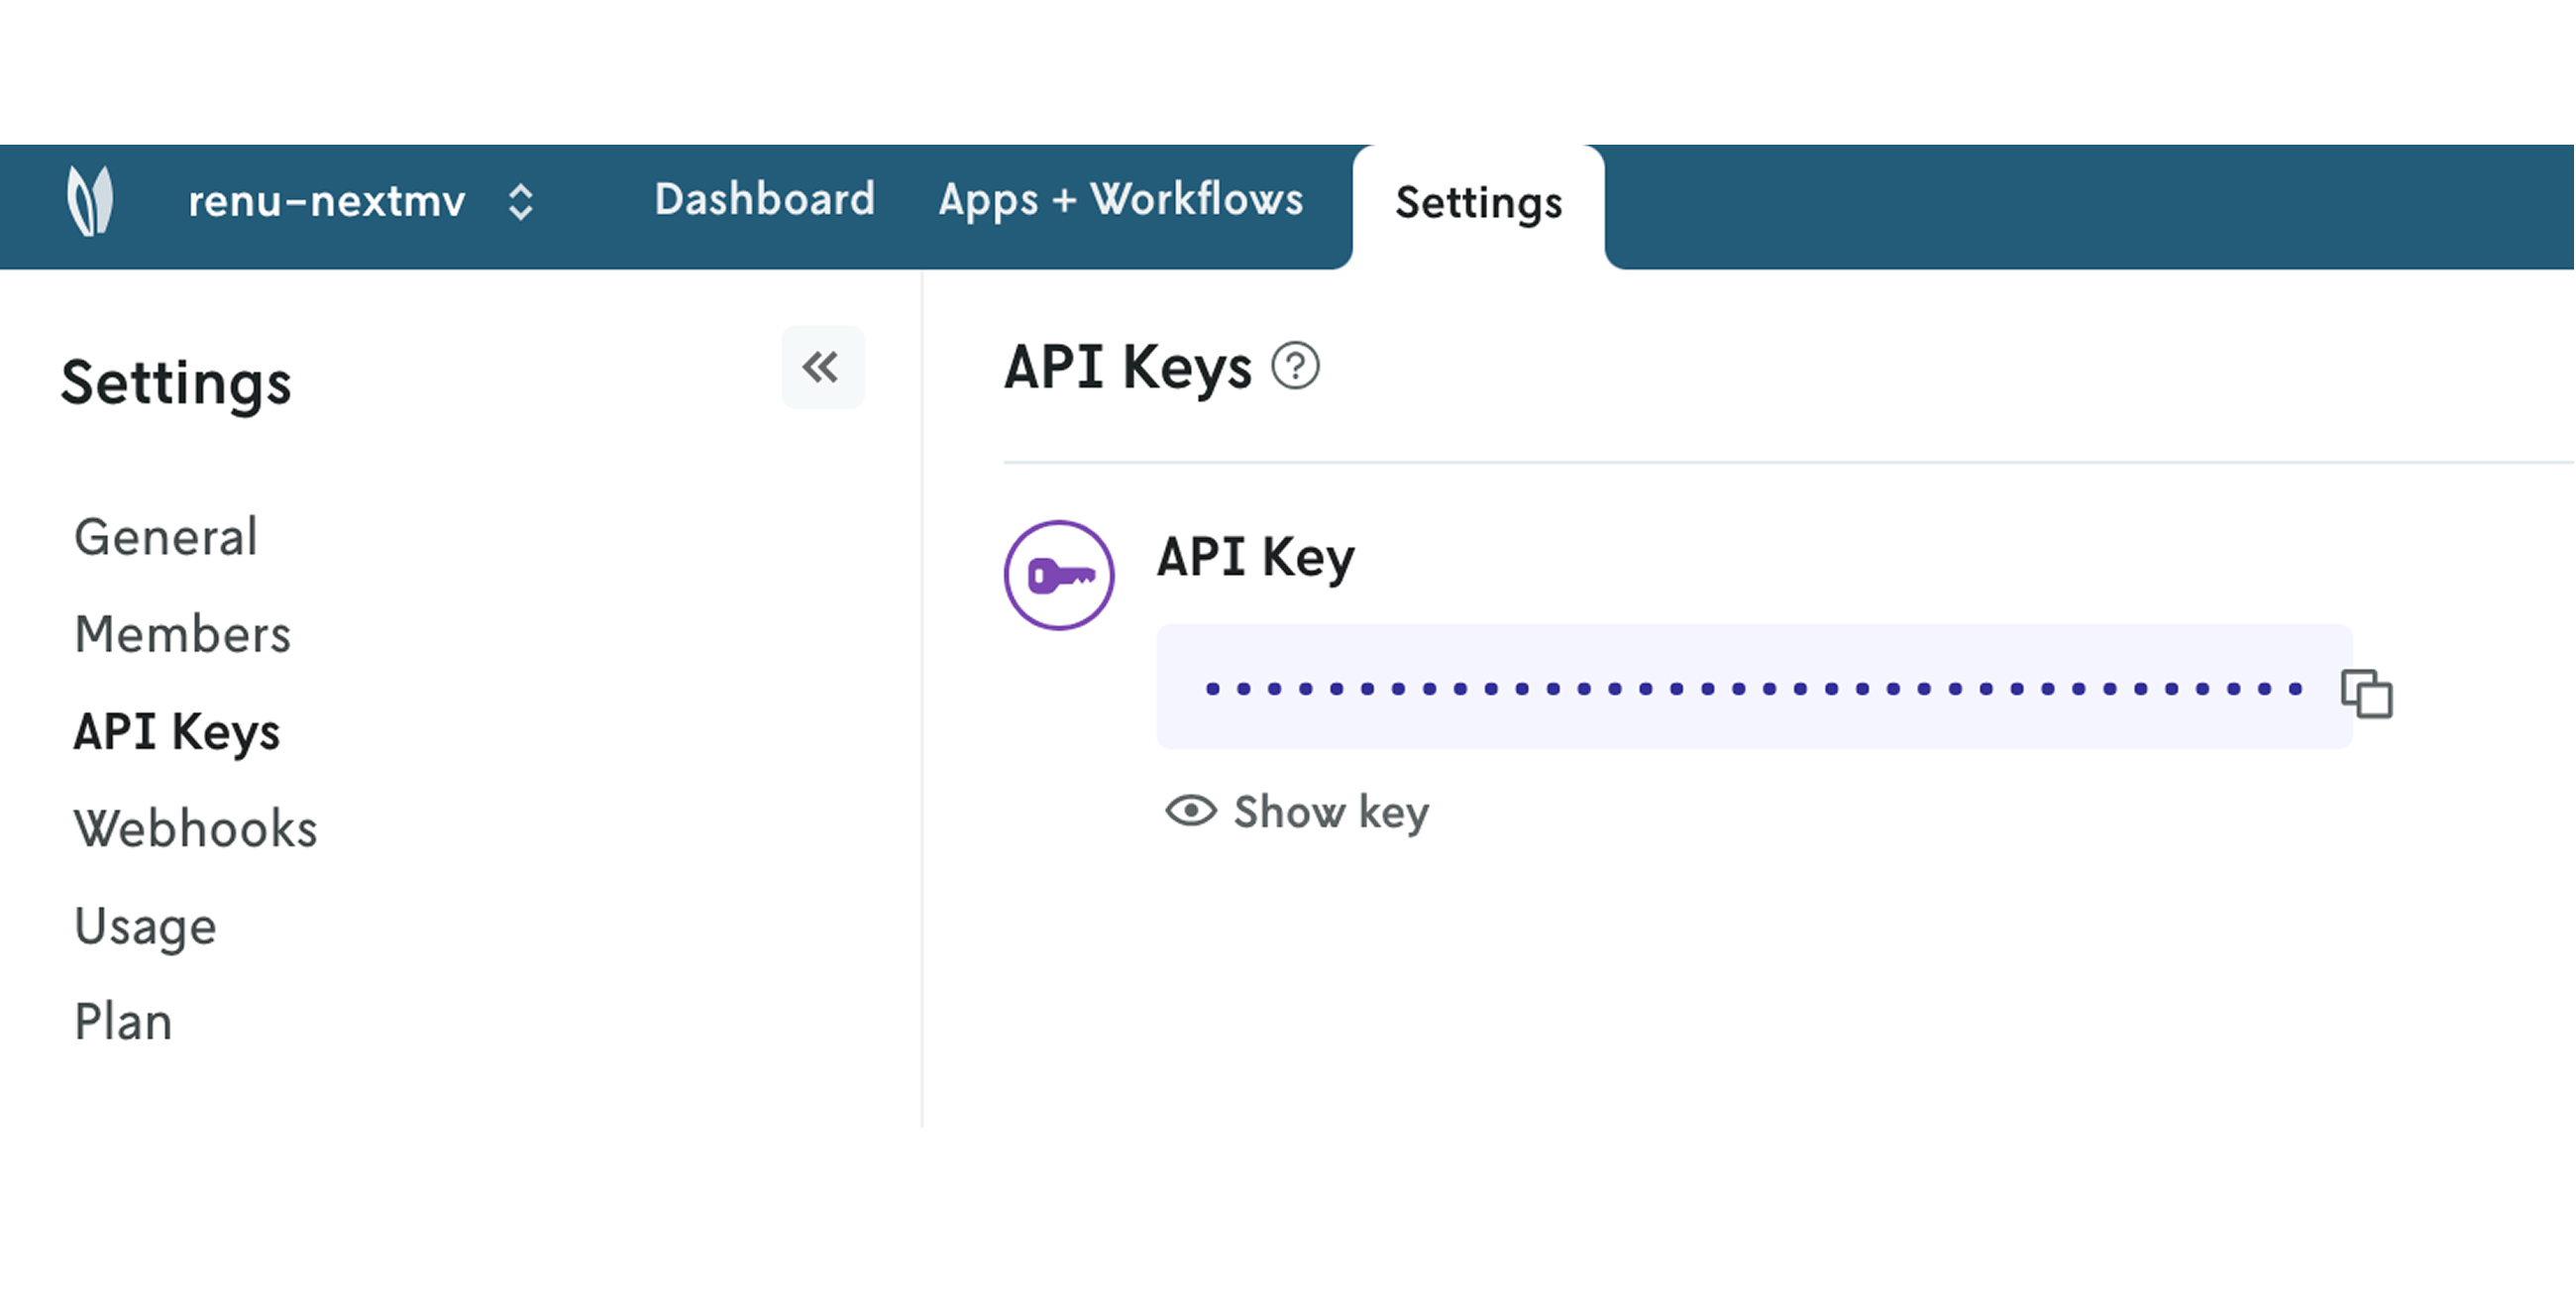
Configure your Nextmv API key. Navigate to “Settings” then “API Keys”. Copy your API key.

Export your API key via the terminal

  • Option 1: From a Mac machine


export NEXTMV_API_KEY=YOUR-API-KEY

  • Option 2: From a Windows machine

    Note: If you are using a Windows machine, use a PowerShell terminal with administrative privileges to allow for setting the environment variable.


$env:NEXTMV_API_KEY="YOUR-API-KEY"


Create an “app.yaml” file within the same directory (pyomo-example) and paste the following (and save the file):


# This manifest holds the information the app needs to run on the Nextmv Cloud.
type: python
runtime: ghcr.io/nextmv-io/runtime/pyomo:latest
python:
  # All listed packages will get bundled with the app.
  pip-requirements: requirements.txt

# List all files/directories that should be included in the app. Globbing
# (e.g.: configs/*.json) is supported.
files:
  - main.py
  - diet.py

configuration:
  content:
    format: "multi-file"
    multi-file:
      input:
        path: "."
      output:
        solutions: "."
        statistics: "statistics.json"
        assets: "assets.json"


Install Nextmv via terminal

Note: You may need to use “pip3” command depending on your setup


pip install nextmv --upgrade


Create a “push.py” file in the same directory (pyomo-example) and save the file


import os

from nextmv.cloud import Application, Client

api_key = os.environ.get("NEXTMV_API_KEY")
if api_key is None:
    raise Exception("Please set NEXTMV_API_KEY environment variable")

client = Client(api_key=api_key)
if Application.exists(client, id="pyomo-example"):
    app = Application(client=client, id="pyomo-example")
else:
    app = Application.new(client=client, id="pyomo-example", name="Pyomo Example")


app_dir = os.path.dirname(os.path.abspath(__file__))
app.push(app_dir=app_dir, verbose=True)


Create an app from the model and push the app to Nextmv via terminal

Note: You may need to use “python3” command depending on your setup


python push.py


Run the app remotely via the Nextmv UI

  1. Go to the Nextmv UI
  2. Select “Apps + Workflows” from the top menu
  3. Select your new app “Pyomo example”
  4. Click “New run” on the top right
  5. Click “Browse files for input” and select the diet.dat file you downloaded earlier
  6. Select instance “latest”
  7. Click “Start run” in the top right

Navigate to “Output” to see the results

Unlock configurable options and experimentation

In this section, we’ll walk through the steps required to create configurable options and custom statistics (or metrics) in Nextmv for experiments. 

Add “nextmv” to requirements.txt


pyomo
highspy
nextmv


Update the app.yaml file with this code, which adds configuration for options. Completely replace the existing code in app.yaml with the following:


# This manifest holds the information the app needs to run on the Nextmv Cloud.
type: python
runtime: ghcr.io/nextmv-io/runtime/pyomo:latest
python:
  # All listed packages will get bundled with the app.
  pip-requirements: requirements.txt

# List all files/directories that should be included in the app. Globbing
# (e.g.: configs/*.json) is supported.
files:
  - main.py
  - diet.py

configuration:
  content:
    format: "multi-file"
    multi-file:
      input:
        path: "."
      output:
        solutions: "."
        statistics: "statistics.json"
        assets: "assets.json"
  options:
    items:
      - name: solver
        option_type: string
        default: highs
        additional_attributes:
          values:
            - scip
            - highs
        ui:
          control_type: select
      - name: limit_dairy
        option_type: bool
        default: false
        ui:
          control_type: toggle


Update the diet.py file to add the dairy constraint. Completely replace the existing code in diet.py with the following:


#  ___________________________________________________________________________
#
#  Pyomo: Python Optimization Modeling Objects
#  Copyright (c) 2015-2025
#  National Technology and Engineering Solutions of Sandia, LLC
#  Under the terms of Contract DE-NA0003525 with National Technology and
#  Engineering Solutions of Sandia, LLC, the U.S. Government retains certain
#  rights in this software.
#  This software is distributed under the 3-clause BSD License.
#  ___________________________________________________________________________


from pyomo.environ import (
    AbstractModel,
    Constraint,
    NonNegativeIntegers,
    NonNegativeReals,
    Objective,
    Param,
    PositiveReals,
    Set,
    Var,
    inequality,
)

infinity = float("inf")

model = AbstractModel()

# Foods
model.F = Set()
# Nutrients
model.N = Set()

# Cost of each food
model.c = Param(model.F, within=PositiveReals)
# Amount of nutrient in each food
model.a = Param(model.F, model.N, within=NonNegativeReals)
# Lower and upper bound on each nutrient
model.Nmin = Param(model.N, within=NonNegativeReals, default=0.0)
model.Nmax = Param(model.N, within=NonNegativeReals, default=infinity)
# Volume per serving of food
model.V = Param(model.F, within=PositiveReals)
# Maximum volume of food consumed
model.Vmax = Param(within=PositiveReals)

# Number of servings consumed of each food
model.x = Var(model.F, within=NonNegativeIntegers)


# Minimize the cost of food that is consumed
def cost_rule(model):
    return sum(model.c[i] * model.x[i] for i in model.F)


model.cost = Objective(rule=cost_rule)


# Limit nutrient consumption for each nutrient
def nutrient_rule(model, j):
    value = sum(model.a[i, j] * model.x[i] for i in model.F)
    return inequality(model.Nmin[j], value, model.Nmax[j])


model.nutrient_limit = Constraint(model.N, rule=nutrient_rule)


# Limit the volume of food consumed
def volume_rule(model):
    return sum(model.V[i] * model.x[i] for i in model.F) <= model.Vmax


model.volume = Constraint(rule=volume_rule)


#### MODIFIED: Limit dairy
def dairy_rule(model):
    # Find foods that contain "dairy" or milk-related items
    dairy_foods = [i for i in model.F if "dairy" in i.lower() or "milk" in i.lower()]
    if not dairy_foods:
        # If no dairy foods found, return a feasible constraint
        return Constraint.Feasible
    return sum(model.x[i] for i in dairy_foods) <= 3


def add_dairy_constraint(model):
    """Add dairy constraint to the model if needed."""
    model.dairy_limit = Constraint(rule=dairy_rule)

Update the main.py file to wire up options. Completely replace the existing code in main.py with the following:


#!/usr/bin/env python3

import json

import nextmv
from diet import add_dairy_constraint, model
from nextmv import cloud
from pyomo.environ import value
from pyomo.opt import SolverFactory

# MODIFIED - load manifest and extract options to use in the execution
manifest = cloud.Manifest.from_yaml(".")
options = manifest.extract_options()


def main():
    """
    Main function to solve the diet optimization problem using Pyomo functions.
    """
    instance = model.create_instance("diet.dat")

    # MODIFIED - add dairy constraint if specified in options
    if options.limit_dairy:
        add_dairy_constraint(instance)

    # MODIFIED - use solver that was specified in the options
    solver = SolverFactory(options.solver)
    if not solver.available():
        print(f"Error: {options.solver} solver is not available!")
        print("Please install the solver or try a different solver.")
        return
    results = solver.solve(instance, tee=True)
    output_file = "diet_solution.txt"

    with open(output_file, "w") as f:
        if results.solver.termination_condition == "optimal":
            f.write("=" * 50 + "\n")
            f.write("DIET OPTIMIZATION SOLUTION\n")
            f.write("=" * 50 + "\n\n")
            f.write(f"Minimum cost: ${value(instance.cost):.2f}\n\n")
            f.write("Optimal food selections:\n")
            f.write("-" * 40 + "\n")
            total_cost = 0
            for food in instance.F:
                servings = value(instance.x[food])
                if servings > 0:
                    cost_per_serving = value(instance.c[food])
                    food_cost = cost_per_serving * servings
                    total_cost += food_cost
                    f.write(
                        f"{food:18s}: {servings:2.0f} servings @ ${cost_per_serving:.2f} = ${food_cost:.2f}\n"
                    )
        else:
            f.write(
                f"Solver terminated with condition: {results.solver.termination_condition}\n"
            )
            f.write("No optimal solution found.\n")

    # MODIFIED - write statistics for experiments
    statistics_file = "statistics.json"
    with open(statistics_file, "w") as stats_f:
        statistics = nextmv.Statistics(
            result=nextmv.ResultStatistics(
                value=value(instance.cost),
                custom={
                    "nvars": len(instance.x),
                    "nconstraints": len(instance.nutrient_limit)
                    + 1
                    + (1 if options.limit_dairy else 0),
                },
            ),
        )
        stats_f.write(json.dumps({"statistics": statistics.to_dict()}))
    print(f"Results written to {output_file}")
    print(f"Statistics written to {statistics_file}")


if __name__ == "__main__":
    main()


Push the changes up to the model in Nextmv via terminal

Note: You may need to use “python3” command depending on your setup


python push.py


Make two runs of the app via the Nextmv UI

After you’ve pushed the changes up, navigate back to your app in the Nextmv UI and create a new run. Use the diet.dat file as the input and “latest” for the instance.

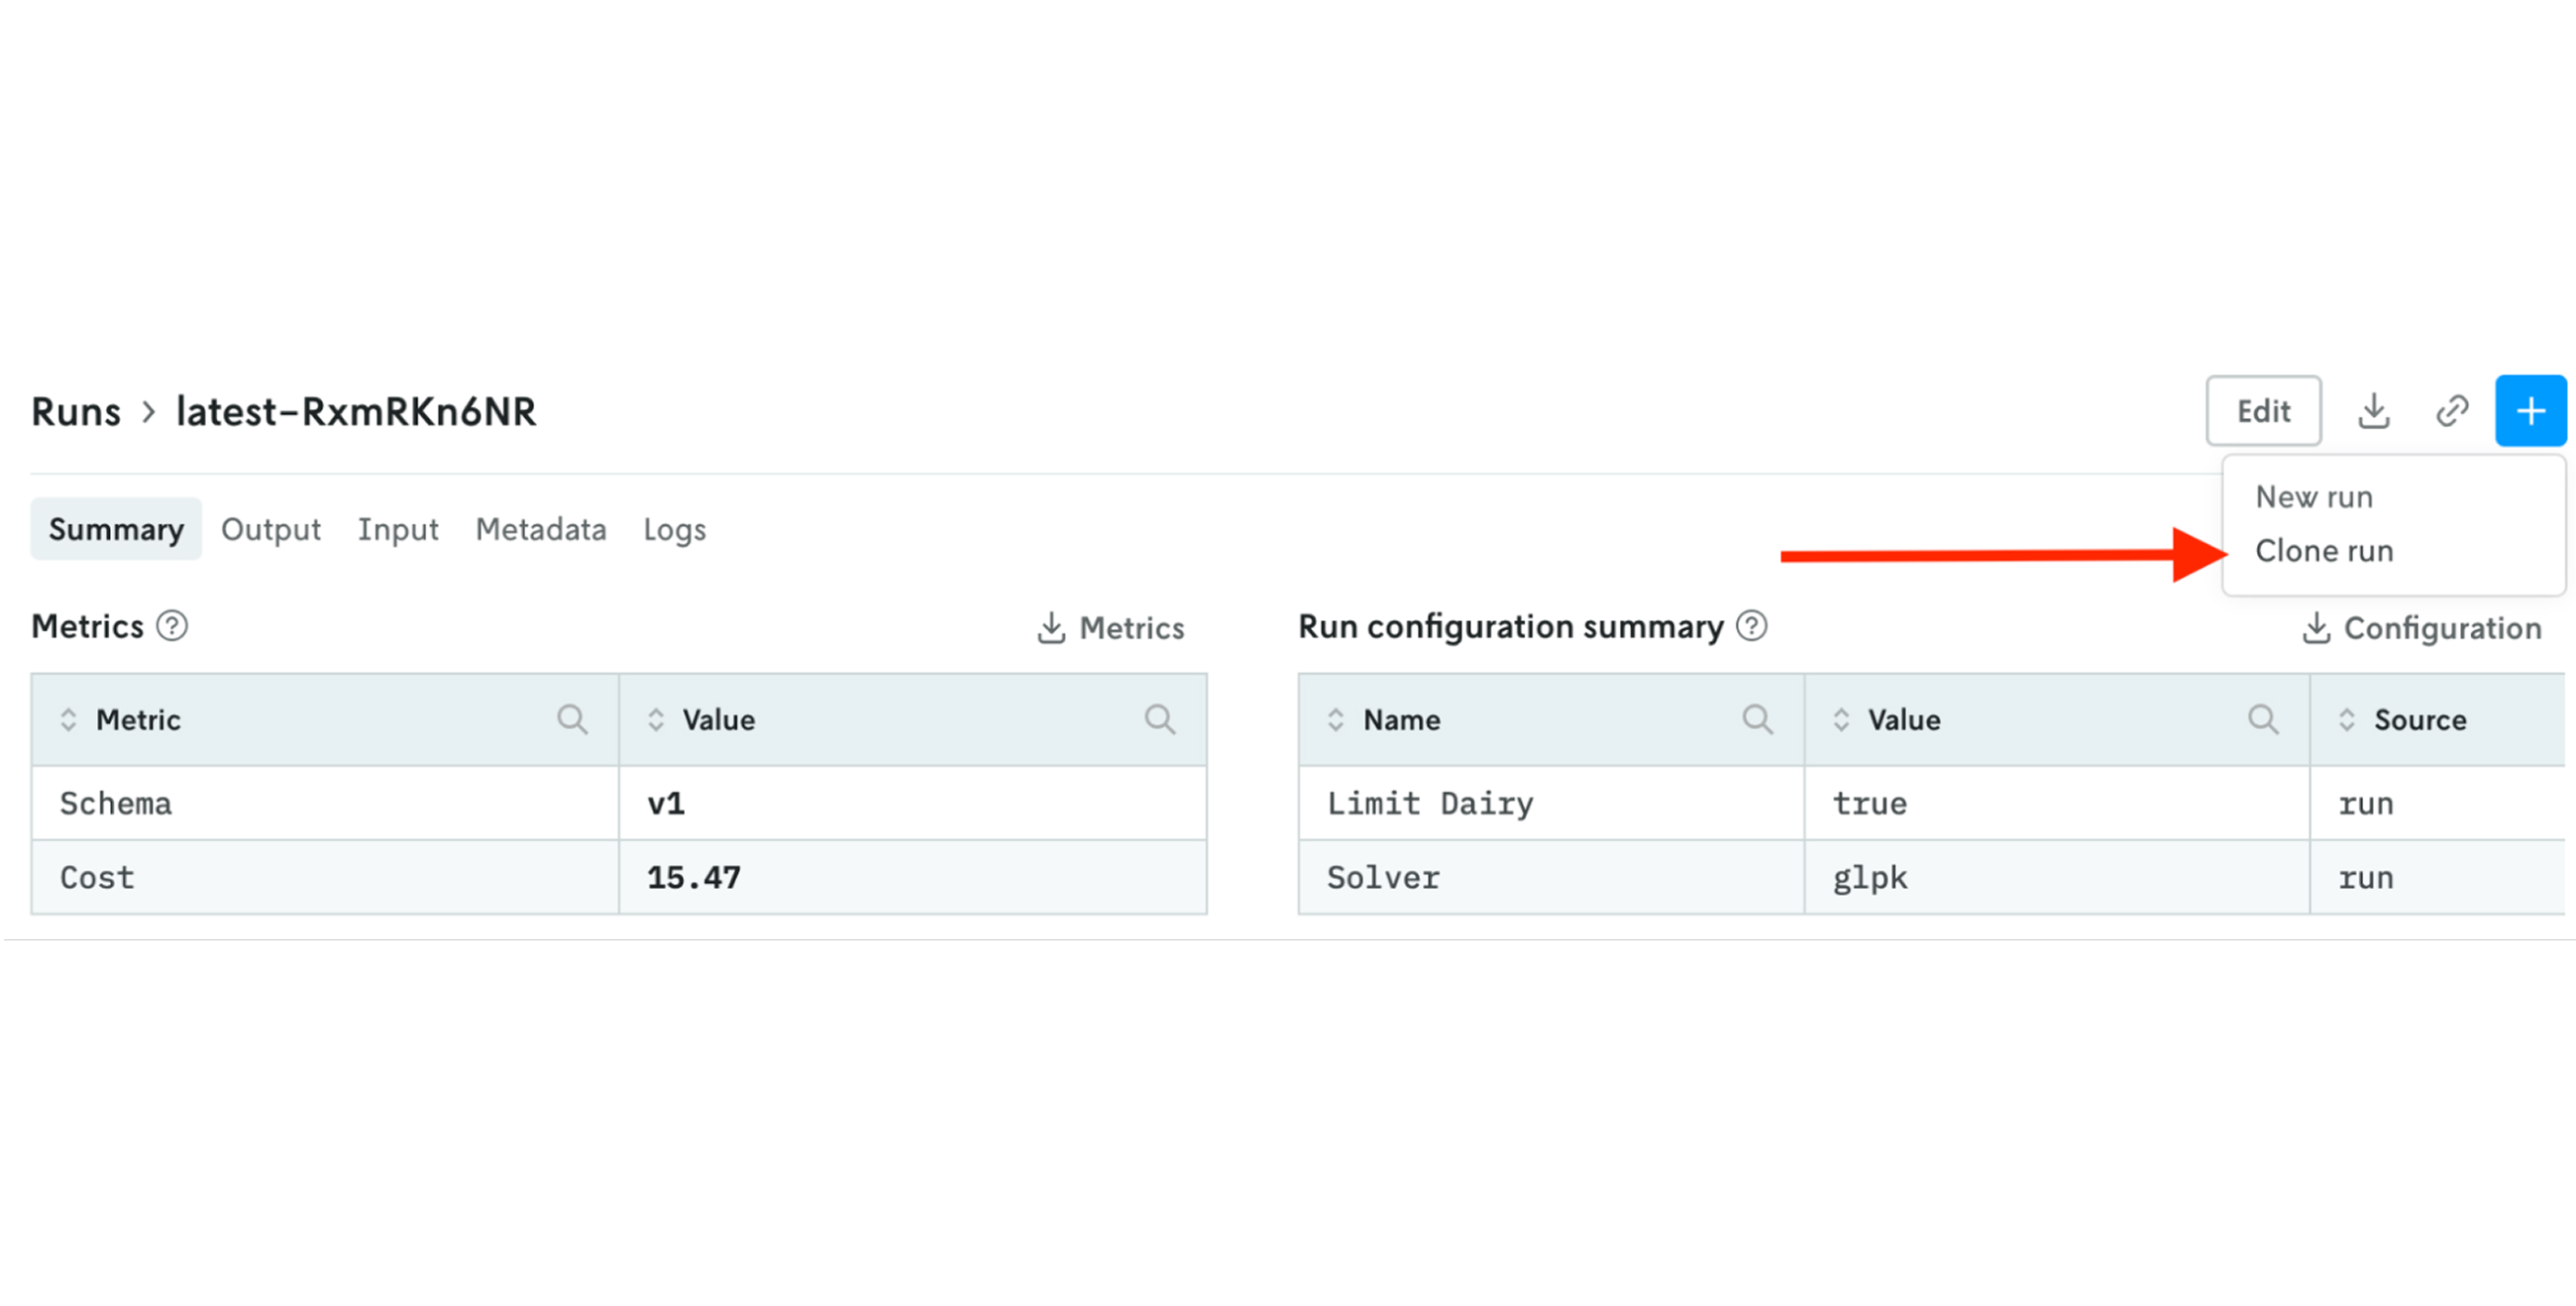
After your first run completes, click the “+” button in the top right and select “Clone run”. For the next run, try updating any of the options (e.g., solver).

Perform a scenario test

In this section, we’ll create an input set from existing runs and create a scenario test using the configurable options we wired up in the steps above.

Make an input set

  1. Under “Experiments” in the left-hand navigation, select “Input Sets”
  2. In the top right-hand corner, click “+” to create a new input set
  3. For “Create Type” select “Instance + date range”
  4. For “Instance” select “latest”
  5. For “Date Range” select “Past 24 hours"

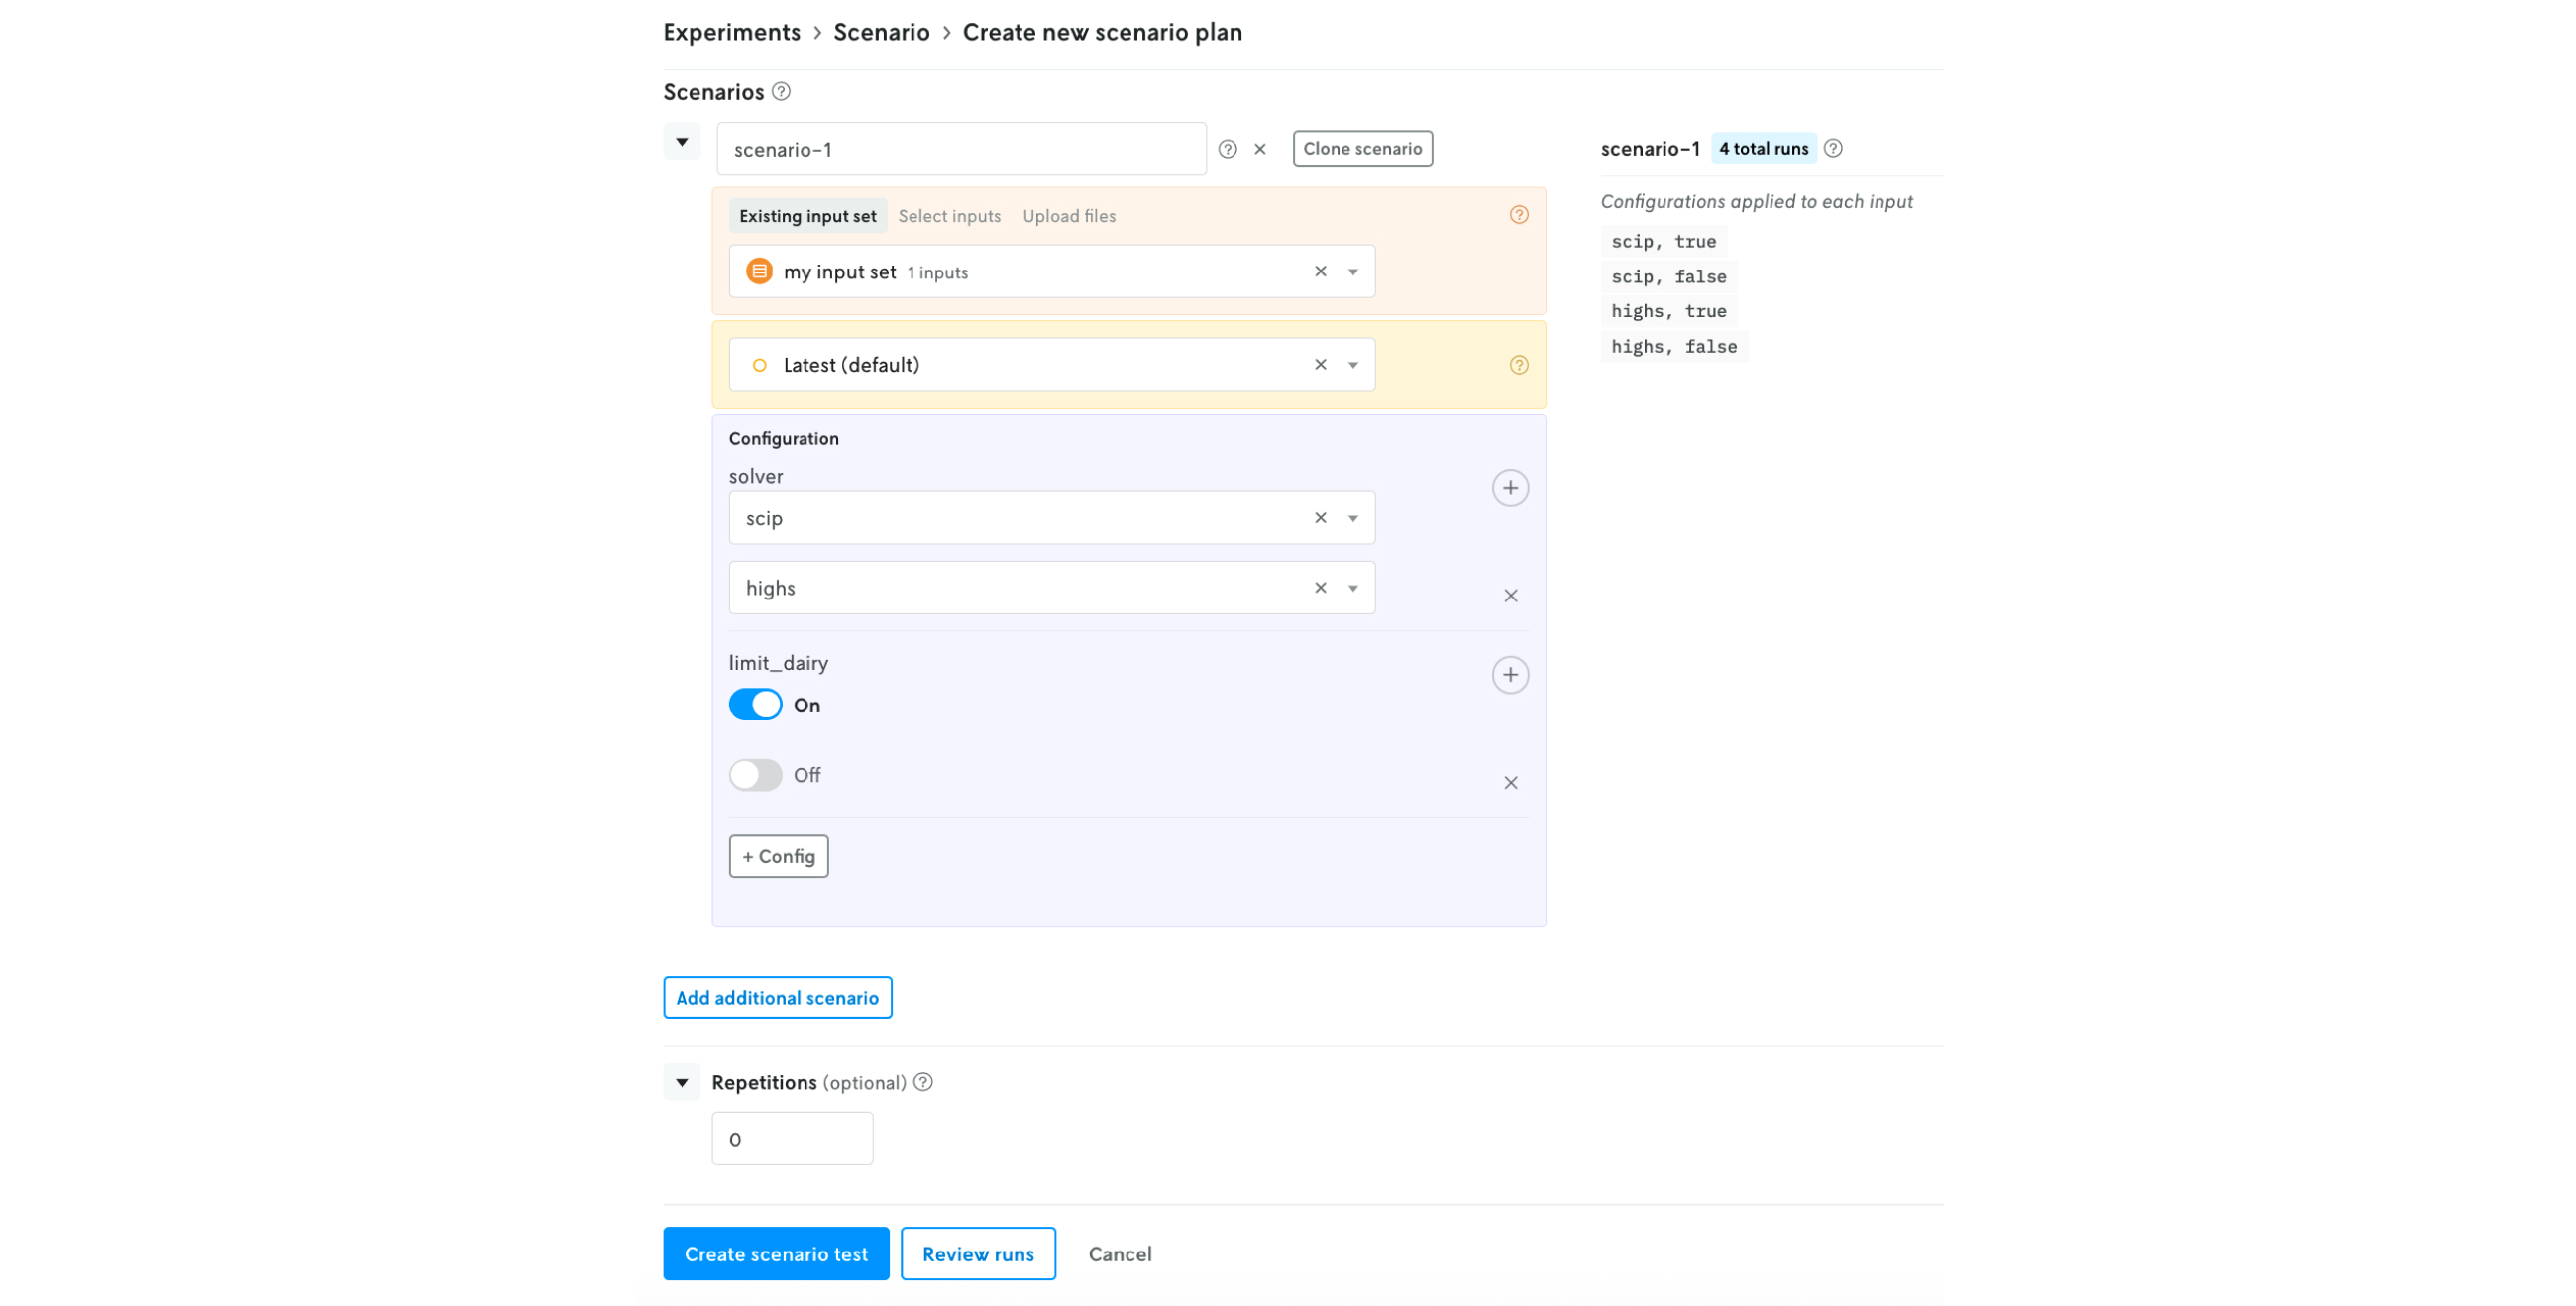
Create a scenario test varying limit-dairy

  1. Under “Experiments” in the left-hand navigation, select “Scenario”
  2. In the top right-hand corner, click “+” to create a new scenario test
  3. Select the input set you just created
  4. Select “latest” instance
  5. Under Configuration, choose solvers “highs” and “scip”
  6. Under Configuration, add another option for “limit_dairy” and toggle it to “On”
  7. Click “Create scenario test”

Congrats! You’ve created a scenario test. You should see results that look like this:

We can see in this small example that limiting dairy did increase the total cost, but there was no impact on total cost from switching solvers. 

What’s next?

Have questions? Reach out to us. We’d love to help. If you’re ready to keep exploring, try running more scenario tests, connecting your own Pyomo model, and inviting your teammates to join in!

Video by:
No items found.