


Imagine this: You work for a large food retailer based in Cologne, Germany with stores distributed nationwide with local depots and distribution centers. You’re part of the team responsible for optimizing a number of operational decisions at the company: inventory pricing, marketing campaign spend, employee shift rostering, and vehicle routes for goods distribution. Needless to say, there’s a lot happening behind the scenes to make the best decisions in the time you have.
Recently, leadership decided to acquire a large bakery in order to sell high-quality baked goods from each of your stores. You’ve been tasked with creating the delivery routes that transport goods from the bakery hub to store locations. How do you efficiently create, customize, and deploy a solution that solves this new vehicle routing problem for your company?
There are two paths to explore: manual or automated. For the manual solution, a classic spreadsheet approach might seem like the path of least resistance. But it doesn’t scale well, won’t easily integrate into your digital processes, and requires manual work to maintain it on top of your normal, everyday tasks. For the automated solution, you know there are algorithms and mathematical models to solve these types of problems. It’s certainly a more scalable and efficient option. You could probably build something from scratch. But you’re short on time when it comes to researching, implementing, and deploying one of them.
But what if there was another option that didn’t involve spreadsheets or researching specialized algorithms? At Nextmv, we’re building a decision automation platform for developers that lets you build, test, deploy, and operate decision services using familiar software development paradigms.
In this blog post, we will use the Nextmv Platform to efficiently solve our baked good distribution problem. We'll get set up in a matter of minutes and start adding customized constraints that create tailor-made solutions for our specific use-case. Let’s go!
The 5-minute, CLI-guided setup
Time is ticking. Your company has announced freshly baked buns are coming to their stores. Drivers are waiting for their routes. Customers are eager to buy. So let’s get started!
Step 1: Install Nextmv CLI and Nextmv SDK
Your starting point for all of this is your Nextmv account. There you will find two simple commands containing your unique API key that you need to execute in your terminal to get going. The first command downloads and installs the Nextmv CLI:
The next command configures the CLI:
Perfect, that's all you have to do to set up the basics. To confirm your installation has been successful, simply type nextmv into your terminal. You’ll also see the available CLI commands to help us with our decision modeling problem.

Our next step is to download and install the Nextmv SDK, our decision modeling and solving framework. You can do this with a single command:
Excellent. Now we have everything needed to create our vehicle routing decision model. You’ll see that you have two starting points: initialize a pre-built decision model (we call them templates) or build your own from scratch. Since we have a vehicle routing problem, let’s spin up the routing template.
Step 2: Initialize and run a template
First, let’s create a new directory where this template should be initialized. Then navigate to it to execute the following command in the CLI:
You will see that the result of this command is a subdirectory called "routing" with some files, including the readme.md (template overview, commands, and other resources), main.go (the file that holds the main method), and input.json (a sample input file following the input schema defined in the main.go file). Let’s go ahead and run this template:
Congratulations! You’ve got an output JSON containing optimized routes for our sample data that minimizes vehicle time on the road. You’ve solved your first routing decision model with Nextmv — and all in just a few minutes.
Now let’s configure and customize this template to meet our needs.
Customizing our vehicle routing decision model
Within just a few minutes, we’ve gone from zero to running a working vehicle routing model that uses some sample data via the Nextmv CLI. Now we need to represent our business data and logic. So far, all that we’ve defined about our problem is that vehicles are distributing goods to individual stores from a centralized bakery hub.
If you open the main.go file, you can see all of the out-of-the-box constraint options available for the routing template. Already, we can see a few constraints we probably don’t need to include such as stop precedence (since we’re only handling drop-offs), so let’s remove them for now (we can always refer to the template main file to see what kind of options are available).
Awesome, our decision model is already looking better. Let’s test it and see what kind of results we get. For our test, we use a small sample file with just two vehicles and ten of our stores in Cologne, Germany. This should be enough to get a sense that the model works as we expect it to.
This is how the first solution for our actual problem looks like in a simple visualization:
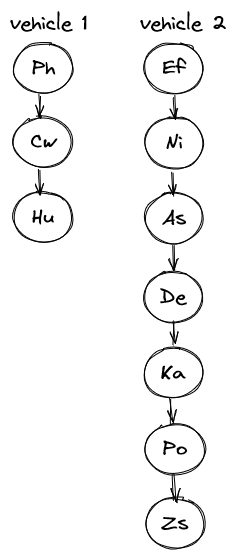
You can see that both vehicles are used to deliver our baked products to the ten stores. These look like feasible routes for your drivers. Success!
But what if there are constraints that aren’t readily available in the template? How do we represent that in our model? With just a few adjustments to our model, we can add one in.
Adding a custom constraint
Not all vehicle routing problems look and feel the same and changes in business logic (for many reasons) are inevitable. This is why customization is key. For our distribution problem, let’s say a typical delivery flow looks like this:
- At the bakery, trays of goods get loaded into storage racks
- The storage racks get loaded onto a delivery truck
- A delivery truck services a stop by unloading their racks of goods
- The truck then picks up empty storage racks from the previous delivery to return to the bakery at the end of its route
Now, let’s say in our input file we define two types of store sizes: standard and large. Our vehicles have a fixed capacity and are unable to carry bakery racks from more than one large store concurrently due to volume. This means that one vehicle cannot service two large stores on the same route.
In the routes that we generated before, you can see that the current result does not obey such a rule. The two stops Ef (=Ehrenfeld) and As (=Altstadt) are classified as large stores and therefore should not be on the same route.
We can represent this custom business logic by adding a custom constraint to our vehicle routing model. In the end, our custom constraint definition looks like this:
Great, we’ve successfully added the new custom constraint to our model definition in our main.go file. Let’s check the results to see the impact of our new custom constraint on our routes.
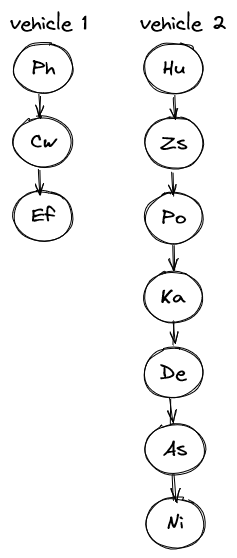
The structure of the routes looks the same as before, but if you look closer you can see that a couple of things have changed. The stops Ehrenfeld and Altstadt are both on different vehicles now, which means our custom constraint works and translates this business rule into our decision model.
Let's quickly recap where we are right now:
- We initialized and ran a decision model with just a couple of commands.
- We’ve configured the default template to exclude constraints that are not relevant to our use case, and then added the SizeClassificationConstraint, a custom constraint that customized our model to account for unique business rules (different store sizes) related to our vehicle and stop attributes.
- We’ve updated our input schema to account for our new custom constraint
- When we run our model, the solver will work to find a feasible solution that minimizes duration of time on the road (per the default value function).
But what if you need to optimize for something different with a custom value function?
Creating a custom value function
Let’s say that you’ve gotten feedback from drivers about their experience with the routes generated by your decision model that’s been running in production for a few weeks. Some drivers feel like their routes are too packed, while other drivers sometimes have fewer stops and shorter routes (see visual above for example). In essence, the volume of stop assignments aren’t balanced across the fleet.
Your routing model currently seeks to minimize the total time on road for your routes. Your routing model currently uses the default value function, so the best solution is the one that minimizes time on road. The number of stops assigned to each driver is not part of this equation (yet!). Therefore, the number of stops can, and does vary — sometimes widely — from driver to driver (and from run to run). Let's see what it looks like to balance routes across drivers AND minimize total time on the road.
First, we need to define what balance means in our use case. Put simply, our objective is for all vehicles to have roughly the same number of stops assigned to their routes. If we use the total travel time per route as a proxy for stop assignments, we can achieve our objective by minimizing the delta between the longest route time and the shortest route time. We’ll also add a penalty factor to adjust the overall value of the whole fleet. Conceptually, our value function looks a bit like this:
min travel time [s] + ((route with maximum # of stops - route with minimum # of stops) * penalty [s])
To represent this in our model we need to first create a new structure (`struct`), which is a collection of data fields that will serve as our interface to implement the customized value function. We also need to do a little bookkeeping in the customized value function. Therefore we track the individual vehicle values, current fleet value, the length of the shortest and the longest route, and the number of unassigned stops and the penalty for unassigned stops. It looks like this:
The new value function has to take care of a couple of things. First, it must sum the individual vehicle values into a total solution value for the fleet. Second, it checks for the values of the longest and shortest routes in a given solution. Third, it computes the difference between the longest and shortest routes and factors in our penalty value. As we are overwriting the original value function, we also need to account for unassigned stops. Here is how we represent that:
Finally, we can add our new Update function to the routing definition. This implements our new custom value function over the original default.
One thing we have to keep in mind here are concurrent threads of the solver. As you can see in the current routing definition we set the option routing.Threads(2). This means that there are up to two threads that solve the decision model concurrently. With our new Update function we are introducing a map, which will result in problems if we try to write to it concurrently. Therefore, we have two options to take care of this: (1) we use methods like mutexes or a concurrent map to avoid that or (2) we reduce the number of threads to one. Let’s do the latter option here in our use-case for now.
The Update function of the routing takes two parameters: The newly constructed fleetData struct as our interface for the update function of PartialPlans. The second parameter is a struct for the update function of single vehicles. As we don’t change anything here, we can keep the implementation quite simple for this part:
Finally, here is the final routing definition and the initialization of the struct that we need for the update function of PartialPlans. Here, we need to be careful on how we set the initial values for minLength and maxLength. As we check for each found route whether it is shorter than the current shortest route, we set the initial value for minLength to the longest possible route, which in this case is the total number of stops in the input data. Similar to this approach, we set the initial value of maxLength to 0.
Excited to see the results of this model version? Me too, so let’s do another test run:
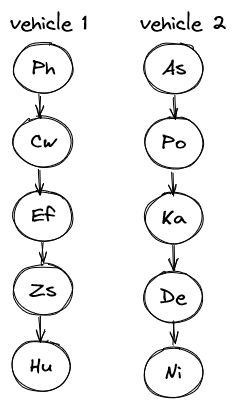
We can immediately see that the workload between both vehicles in this example is balanced now, both serve five stops. We can also see that our large stores (Ef and As) are still on different routes, so our custom constraint is still working in this model version. Your drivers will definitely like this a lot.
With just some additional lines of code, we are already at a place where we have modeled a complex decision problem to implement and improve our baked good delivery operations..
Our vehicle routing problem comes to an end
As you can see in this collection of our solutions, we started at a very simple model.
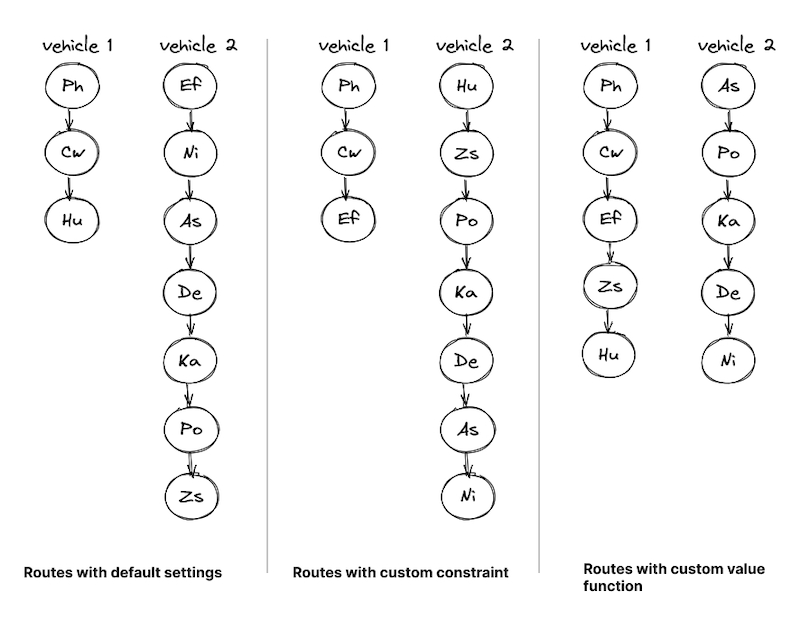
That model was completely based on standard routing options, but already generated working solutions. By adding additional features to the model, we iteratively included different business rules into the model so that the solutions are closer to the real-world needs of this use-case.
If you want to test this out on your own using our platform, just send us a message!
Editor's note (September 21, 2022): This post was updated to reflect CLI command changes from the latest release.


.jpg)


